Uploading and Adding Images
This tutorial will describe how to upload, add and edit an image on
your page.
-
Like anything else you would add to a page, you will need
a web part to hold it. Make sure you are logged in and in edit mode
(Site Actions -> Edit Page) and
add “Plain Content Editor” to the zone of
your choice. In this example, we will add an image to a web part
with several lines of text, although text is not
required.

-
Click inside the Plain Content Editor you added. This will
activate the "Editing
Tools" tab on the ribbon. Click on it, then
click the “Insert” tab.
-
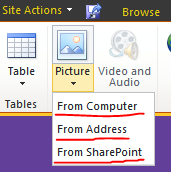
Click on the arrow below
“Picture”. You will
see three ways to insert an image: From computer, From
Address, and From SharePoint. The guide below will show you how to
use each one. You can choose which one fits your needs.
NOTE: If you were to click on the image above “Picture”, it
would be the same as clicking on “From SharePoint”.

“From Computer” – Use this option when the image you
want to use has not been uploaded to SharePoint. This option will let
you upload the image directly to SharePoint and display the picture in
your web part.
-
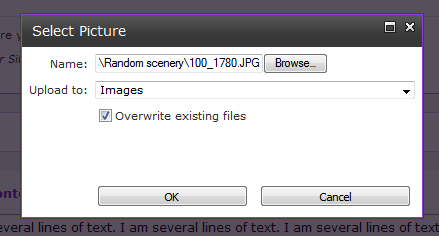
A new small window will appear with three
fields.
-
Click “Browse”. Search for
and select the image saved on your computer.
- The second field is “Upload
to:”. Click this menu and select
“Images”. This field saves the image in the
Images folder of your website.
- There is a checkbox that reads “Overwrite existing
files”. Do not upload two files with the same name with
this option selected, because the old one will be
overwritten.
-
Click “OK” when you are done. Your window
will look similar to this:

-
Your image will display on your text editor now. If not,
click the “Save & Close” (blue floppy disk)
button on the top left of the window and you should be able to see
the image in your page.
-
If you realize you need to resize, add alternate text, or
manipulate the image in some way, please follow the tutorial on how to resize
images.
“From Address” – Use this option when you know the
exact address of where your image is saved within your files in SharePoint.
For example, if you go to “Site Actions” on the top left,
and then click on “View All Site Content”, and then click
on “Images” (it should be listed under “Document
Libraries”), you will be able to click on an image’s name to open it in a
browser window. The address of the picture will be in your address bar.
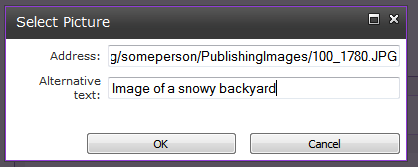
- A new window will appear with two fields.
- The first field is “Address". Here you need
to paste the address where the image is located. Use only images that
you own that are saved in your files in SharePoint.
- The second field is “Alternative text”. This
is also known as “alt text”, and it is displayed when the image fails
to load or when the user is using tools to help people with
disabilities be able to, in a way, “see” the image. Therefore, make
sure that you change the alt text to something relevant to the image.
For example, “Image of John Smith giving a speech during the graduation
ceremony”.
- Click the “OK” button when
finished.

- Your image should display on your page now. If not, click the
“Save & Close” button (blue floppy disk) n the top
left of the window and you should be able to see the image in your
page.
“From SharePoint” – Use this option when the image you
need is uploaded in your SharePoint files, but you aren't sure about
the exact address.
- A new window opens.
- First, check the left side of the window to make sure
that you are currently looking at the files in your website. If it is
not, navigate up or down using the scroll bar to find
them.
- Once you find it, click on it and look for the picture you
need.
- Once you have selected the picture you want, click
“OK”.
- The image should display on your page. If not, click the
“Save & Close” button (blue floppy disk) on the top left of the
window and you should be able to see the image in your
page.
