Secure Your Zoom Meeting Room for UWSP Sponsored Public Events
Note: the maximum number of participants a Zoom meeting can accommodate is 300. For larger audiences, or a more formal presentation format, a Zoom Webinar license can be purchased. To purchase a Zoom Webinar license, please contact Information Technology Purchasing.
Using Zoom or other web conferencing tools for public meetings and events can increase the likelihood of unwanted guests and behaviors disrupting your meeting. A new term, "Zoombombing", was coined and is now well-known due to the rapid increase in these disruptive behaviors.
You can minimize the potential for Zoombombing by using good security practices when creating and starting your Zoom session.
Information Technology recommends the following security practices when hosting a Zoom event:
Plan Ahead - Enlist a Co-Host
Enable Registration For Your Meeting.
When Creating Your Zoom Session Set a Passcode
Enable Zoom's
Waiting Room
Prevent Participant
Screen Sharing
Mute Participant
Audio
Disable Participant
Chat
Prevent Participants From
Renaming Themselves
Disable
Participant Annotations During Screensharing
Remove a Participant
Disable
Participant Video
Enable
Join and Exit Sounds for Participants
Lock Your Meeting
What if I
don't use the Waiting Room?
IMPORTANT: Unless unavoidable, NEVER post online meeting IDs, passcodes, or meeting join urls to public media such as web pages and social media sites.
Add a Co-Host to Help Monitor Your Event
A Co-Host can help you manage participants by monitoring and allowing access from your Zoom Waiting Room. A
Co-Host can also help monitor Chat, scan participant tiles for questionable video, and watch for and remove a troublesome participant if needed.
Enable Registration
Using participant Registration allows the Host to review information collected prior to the event such as the names and emails of registrants and even responses to questions asked during the registration process.
Important to know:
Enabling registration for a meeting can only be done from within the
Zoom web portal.
Registrants joining your meeting MUST use the
Zoom desktop client or mobile app. They will be unable to join a meeting with the web client if registration is used.
If you are hosting a more formal event and/or anticipating a large attendance you may wish to consider purchasing a Zoom Webinar license for your event. Compare Zoom
Meetings vs. Webinars.
To enable registration for a Zoom meeting, please see Zoom's
documentation.
Note: Registrants can use any name and email address they wish when registering for your Zoom event. Scanning your registration list may let you know if you have an uninvited registrant.
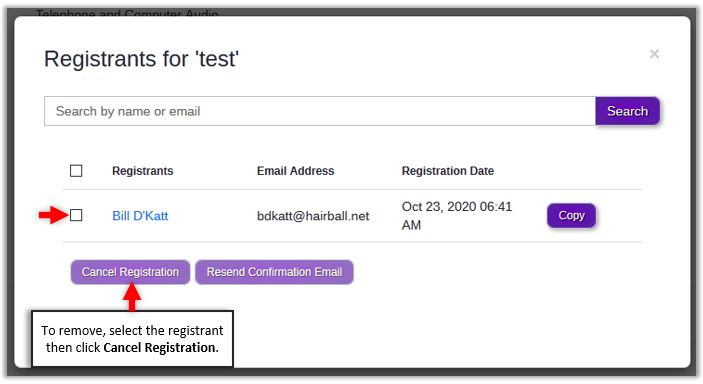
To view your registrants, click the name of your meeting in your zoom portal. Edit will not display Registration settings.

Scroll down to your Registration settings. To the right of Registrants click View.

To remove a registrant, place a check to the left of the name and click Cancel Registration.
Set a Passcode
A
Passcode is automatlcally generated and is selected when you schedule a meeting through UWSP's Zoom service. Make sure to provide the meeting Passcode to your participants.
Enable the Waiting Room
The
Waiting Room is selected by default when you schedule a Zoom meeting. In smaller meetings, using the
Waiting Room allows meeting Hosts and
Co-Hosts to review participant names prior to admitting them to the meeting or event. For larger events, managing a Waiting Room can become difficult without the assistance of a
Co-Host. If you choose not to use the Waiting Room, it is STRONGLY recommended that a meeting Passcode be used to grant attendee access to your event.
IT recommends that you not disable the meeting Passcode and Waiting Room unless you deem necessary as they are your first line of defense to potential Zoombombing.
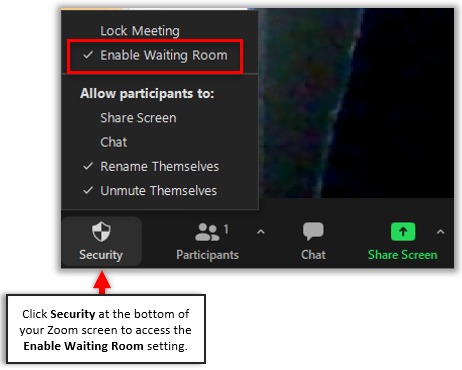
If needed, you can enable/disable the Waiting Room from within your Zoom meeting. Select
Security from the bottom of the Zoom screen to enable/disable the
Enable Waiting Room setting.
When you (or another designated "Host"), is ready to start the event,
consider disabling the following settings, or be prepared to disable certain settings should you discover a disruptive participant.
Disable Participant Screen Sharing
Participant screen sharing is the main cause of disruption from Zoom bombing and is the reason this setting is disabled by default. If your event requires screensharing, monitor all screen activities carefully.
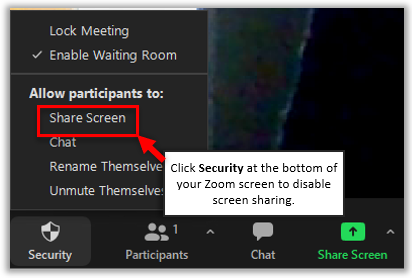
To disable participant screensharing, select
Security from the bottom of the Zoom screen and uncheck
Share Screen.
Disable Participant Audio
To disable participant mics, select
Security from the bottom of the Zoom screen and uncheck
Unmute Themselves.
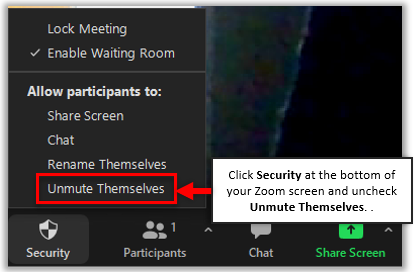
It is important to know that if participants have already enabled their audio, unselecting the
Unmute Themselves option will not take effect unless their mic is already muted.
If you have not unchecked the
Unmute Themselves option prior to some participants activating their mics, but decide later to disable your attendee's audio, you can still do so.
To disable all participants' audio, click
Participants to open the
Participants list. At the bottom of the
Participants list, click
Mute All.
In the
Mute All box that opens, uncheck
Allow Participants to Unmute Themselves, then click
Yes.
The
Unmute Themselves option under Security now prevents participants from re-enabling their audio.
Disable Chat
While
Chat allows participants to submit questions without interrupting a speaker, it is easy to disable if needed. Hosts still have access to post information and share resource links and files. You can also allow chat between participants and Host/Co-Host only to allow participants to submit questions and provide help in troubleshooting potential connection issues.
To disable participant chat, select
Security from the bottom of the Zoom screen and unselect
Chat.
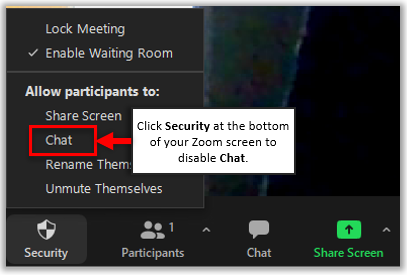
To allow chat between participants and the Host/Co-Host only, open
Chat at the bottom of your Zoom screen. At the bottom-right of the
Chat pane click the
Ellipses (...) and select
Host Only from the fly-out menu.

Prevent Participants From Renaming Themselves
This allows renaming of a participant's name as it displays in your Zoom meeting. By default, participant names are automatically based on their UWSP Zoom account, or in the case of guests, their computer’s user name. If you leave this setting enabled, consider occasionally reviewing your Participant list for any questionable names.
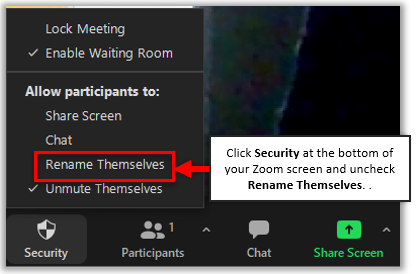
To disable your participants' ability to change their display name, select
Security from the bottom of the Zoom screen and unselect
Rename Themselves.
Rename a Single Participant
If an external attendee's name has defaulted to displaying their computer name (e.g. "My Computer",
or something more questionable) and you believe that displaying their own name might be more beneficial to your meeting dynamics, you can offer to change their display name for the event if they are unable.
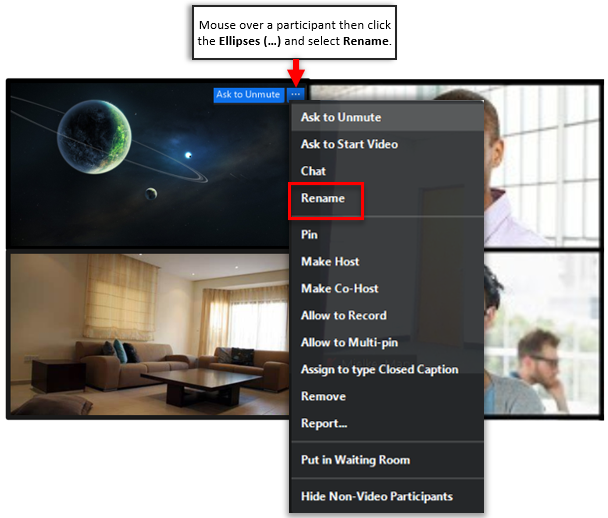
To change their display name for the event, mouse over the participant's video tile then click the
Ellipses (...) in the tile's upper-right corner. Select
Rename from the fly-out menu.
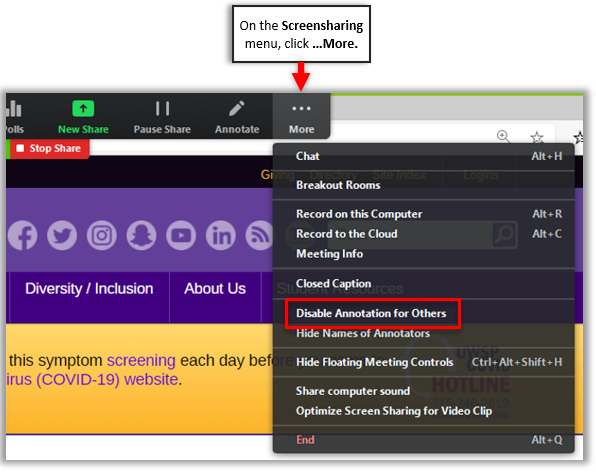
Disable Participant Annotations During Screensharing
If there is no need for your event attendees to annotate when you are screensharing, consider disabling your participants' ability to do so.
At the right of the screensharing menu click
...More, then select
Disable Annotation for Others.
If You Need to Remove a Participant
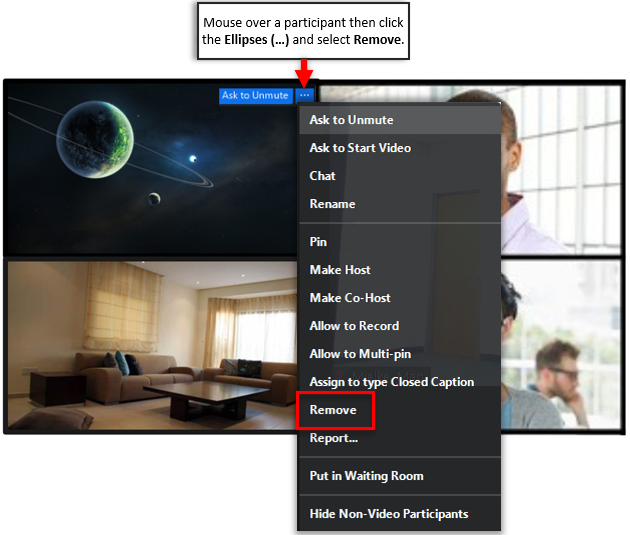
You can remove a participant if you find that they are being disruptive, or if an uninvited participant has entered your Zoom session.
Mouse over the participant's video tile then click the
Ellipses (...) in the tile's upper-right corner. Select
Remove from the fly-out menu.
Note: If you remove a participant from your event, they will be unable to rejoin with the same email address.
Disable a Participant's Video
To disable an individual participant's video if needed, mouse over the participant's video tile then click the
Ellipses (...) in the tile's upper-right corner. Select
Stop
Video from the fly-out menu.
If you don't use the Waiting Room
Enable Participant Join/Exit Sounds
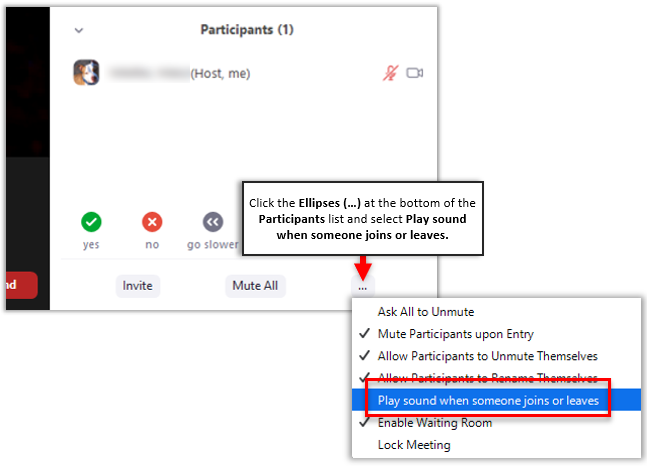
For smaller meetings, consider enabling a sound to let you know when someone new has joined.
To do this, click
Participants to open the
Participants list. At the bottom of the
Participants list, click the
Ellipses (…). From the fly-out menu select
Play sound when someone joins or leaves.
Lock Your Meeting
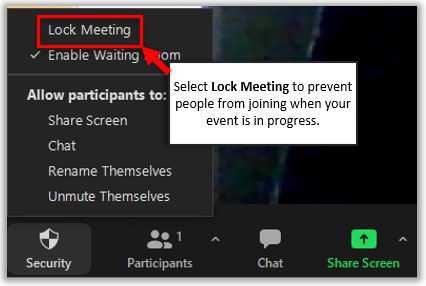
For large events where you most likely do not know all of your attendees you may wish to lock your meeting after your event begins.
To lock your meeting, click
Security along the tools list at the bottom of the Zoom screen to open the fly-out menu. Place a check next to
Lock Meeting.
For questions regarding Zoom, please contact the
Service Desk.
