New Employee Supplemental Training Materials


Accident Reporting

Employees who are performing work for the University and on UWSP payroll system are covered under Worker’s Compensation for work-related injuries.  Injuries must be reported to supervisors immediately. 

Ascension Saint Michael’s, Marshfield Clinic, and Aspirus are examples of the closest treatment facilities to the main campus. In the event of a medical emergency call 911 or Protective Services (x3456).

The injured employee and the supervisor must complete worker’s compensation injury reports for any work-related injury. These forms must be submitted to UWSP Human Resources within 24 hours. An accident investigation will be conducted for every injury. For additional information visit the UWSP Worker's Compensation webpage.

Bloodborne Pathogens - Awareness

Bloodborne pathogens (BBP) are microorganisms such as viruses or bacteria that are carried in blood and may cause disease in people.  Bloodborne pathogens include: Malaria; Syphilis; Hepatitis B (HBV); and Human Immunodeficiency Virus (HIV). 

Bloodborne pathogen waste will carry the following red or orange label:


Employees who may encounter occupational exposure must be offered HBV vaccination within 10 working days of the initial assignment. Job classifications with potential occupational exposure to blood or potentially infectious materials have been identified and listed at UWSP BBP Exposure Control Plan. See UWSP Bloodborne Pathogens Exposure Control Plan and check with your supervisor about scheduling this vaccination series.

Exposure Control

In the event of a potentially infectious exposure, clean the exposed area (hands, face, etc) immediately and notify your supervisor and either EHS, Personnel, or Protective Services. EHS will assist in determining if medical attention is necessary. If EHS is not available, proceed to Saint Michael's emergency room (or the closest emergency room available) to determine if additional medical attention is required. Notify Protective Services at X3456 during off-hours.

Rules to follow:

  • Treat all blood or potentially infectious body fluids as if they are contaminated.
  • Stay away from the area and contact your supervisor to have the area cleaned properly by trained individuals (custodians).  Do not clean up blood unless you are trained. 

If contact is unavoidable, wear personal protective equipment included in biohazard kits (available in the M&M Storeroom), and report all exposure incidents to supervisors.

For additional information visit the Bloodborne Pathogens page.

Confined Space Entry Awareness

This is awareness-level information regarding confined space entry.  This training does not authorize any employee to enter or be involved in a confined space entry.  Individuals who are actually involved in confined space entry must receive additional training on proper entry procedures.

A "CONFINED SPACE" means a space that meets all of the below conditions:

  1. Is large enough and so configured that an employee may bodily enter and perform assigned work;
  2. Has limited or restricted means for entry or exit; and
  3. Is not designed for continuous employee occupancy.

Examples of confined spaces: Steam Pits, Storage Tanks, Compartments of Ships, Process Vessels, Pits, Silos, Vats, Wells, Sewers, Digesters, Degreasers, Reaction Vessels, Boilers, Ventilation & Exhaust Ducts, Furnaces, Railroad Tank Cars, Tankers (part of a Tractor-Trailer Unit), Tunnels, Underground Utility Vaults, Pipes, or Pipelines.

A PERMIT-REQUIRED CONFINED SPACE is a confined space that has one or more of the following characteristics:

  1. Contains or has a potential to contain a hazardous atmosphere (e.g. methane, CO, oxygen depletion, hydrogen sulfide, etc);
  2. Contains a material that has the potential for engulfing an entrant (corn, water, etc);
  3. Has an internal configuration such that an entrant could be trapped or asphyxiated by inwardly converging walls or by a floor which slopes downward and tapers to a smaller cross-section; or
  4. Contains any other recognized serious safety or health hazard (e.g. moving parts, hazardous chemicals/materials, fall hazard, poor visibility, etc).

    OSHA regulates PERMIT-REQUIRED CONFINED SPACES.  Permit spaces must be identified by posting danger signs at the entrance.  See below for an example of a sign:


Specific entry procedures must be followed when entering a permit-required confined space. This includes, but is not limited to: coordination with the fire department for rescue before entry, having an attendant, completing an entry permit, making the space safe for entry, locking out moving parts, relieving stored energy, atmospheric testing, ventilation, draining tanks, cleaning, wearing personal protective equipment, etc.  Each person involved in a Confined Space Entry must have received specific safety training prior to entry. Entrants and attendants must also have First Aid and CPR Training. Departments are responsible for ensuring confined space procedures are developed. Contact EHS for assistance in confined space compliance. Individuals not authorized or properly trained must never enter a permit-required confined space.  This includes entering a permit-required confined space to attempt a rescue.  Approximately 2/3 of all individuals killed in permit-required confined space accidents are would-be rescuers.  Individuals involved in confined space entry and management must attend confined space entry training provided by EHS.
 
Call 911 for all confined space emergencies. The Stevens Point Fire Department is our designated confined space rescue provider.

SeeConfined Space Entry Program for more details.

Fire Extinguisher Safety

The purpose of this training is to familiarize employees with the general principles of fire extinguisher use and the hazards involved with incipient stage fire fighting.  All employees must tour their area and note the type(s) and locations of the fire extinguishers in their Departments. 
 
Used properly, a portable fire extinguisher may save lives and property by putting out small fires or containing fires until the fire department arrives.  Knowing how to use a fire extinguisher is essential not only in the workplace, but also in your home.  This information will help employees properly choose and use a fire extinguisher. However, hands-on training with UWSP Protective Services is required.
 
General Information
 
Individuals should only attempt to extinguish fires that are in the INCIPIENT STAGE (the fire is just beginning).  DO NOT attempt to extinguish fires that are large or out of control.  Trained individuals may only handle this type of fire.  You must evacuate the area and dial 911 if a fire is beyond its incipient stage. 
 
General Fire Fighting Rules:
·         Always call the fire department no matter how small the fire is.
·         Never Fight a Fire that is beyond the incipient stage.
·         Never Fight a Fire if you don't know what is burning
·         Never Fight a Fire if the fire is spreading rapidly beyond the spot where it started
·         Never Fight a Fire involving flammable liquids.
·         Never Fight a Fire if you don't have adequate or appropriate equipment
·         Never Fight a Fire if you might inhale toxic smoke
·         Never Fight a Fire if your instincts tell you not to.
·         Always position yourself with an exit or means of escape at your back before you attempt to use an extinguisher to put out a fire.
·         Always inform your Supervisor.
 
Choosing a Fire Extinguisher
Fire extinguishers are tested by laboratories and labeled for the class of fire they are intended to extinguish.  There are four classes of fires, A, B, C, and D.
 
CLASS A: Fires in ordinary combustible materials (wood, cloth, paper, rubber, and many plastics).
CLASS B: Fires in flammable or combustible liquids (i.e., gasoline, toluene, paint), flammable gases, greases, oils. 
CLASS C: Fires involving energized electrical equipment including wiring, fuse boxes, and circuit breakers. (NOTE:  when electrical equipment is de-energized, extinguishers for Class A or B fires may be used.)
CLASS D: Fires involving combustible metals, (i.e.: magnesium potassium, powered aluminum, zinc) 
 
Some portable extinguishers will put out only one class of fire, and some are suitable for two or three, but none is suitable for all four. Extinguishers must be labeled so those users may quickly identify the class of fire for which they may be used.    
 
Be sure you have the appropriate fire extinguisher for the fire you are attempting to extinguish. *WARNING* IT IS VERY DANGEROUS TO USE A CLASS “A’ RATED EXTINGUISHER ON A “C” CLASS FIRE.  However, if you encounter a class “A” fire and don’t have an extinguisher with an “A” symbol, don’t hesitate to use a “B” or “C” extinguisher.  Then follow-up with a class “A” extinguisher.
 
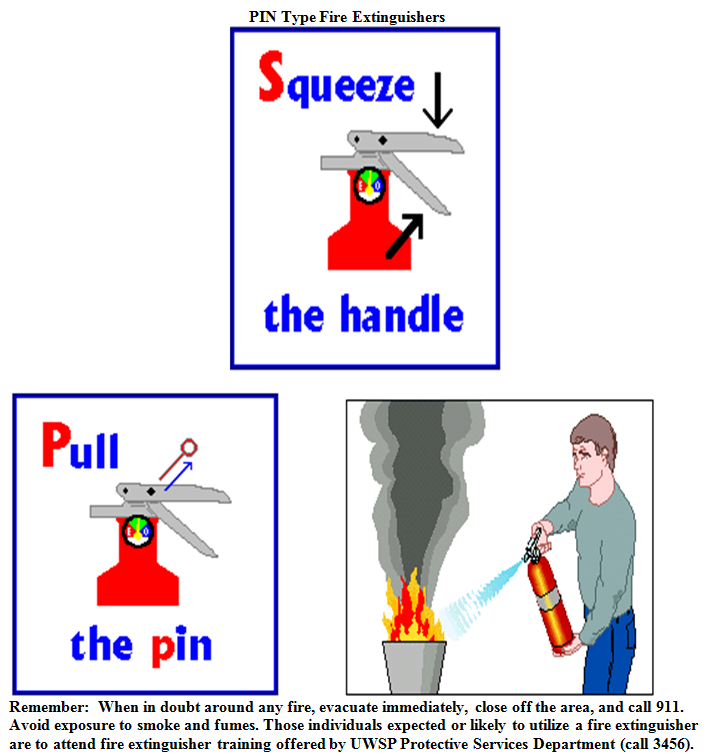
Using the Fire Extinguisher
When using a fire extinguisher always keep your back to an exit and stand twelve feet away from the fire.  Follow the four-step PASS procedure.  If the fire does not go out immediately, leave the area at once.
 
          Pull the pin OR Push Puncture Lever:  This unlocks the operating lever and allows you to use the extinguisher.  Some extinguishers will have a pin and some will have a puncture lever.  Follow instructions on your specific fire extinguisher.
 
Aim low:                            Point the extinguisher nozzle (or hose) at the base of the fire.  Stand 10 feet away from fire.
 
          Squeeze the operating lever: This will  discharge the extinguishing agent.
 
Sweep:                              Keep the extinguisher aimed at the base of the fire and sweep back and forth until the flames appear to be out.
 
All fire extinguishers must be clearly marked with operating instructions.  Operating instructions will vary from one type of extinguisher to the next.
 
If an extinguisher has been discharged or damaged for any reason, report it to UWSP Facility Services.


Hazardous Materials - (DOT HAZMAT)

A Hazardous Material (HAZMAT) is a substance or material that has been determined to be capable of posing an unreasonable risk to health, safety, and property when transported in commerce. A HAZMAT employee is one who loads, unloads or handles hazardous materials and who works for a HAZMAT Employer.  All HAZMAT Employees should be trained for,

  • Being familiar with the requirements of the Department of Transportation regulations regarding shipment of hazardous materials,
  • Recognizing and identifying hazardous materials,
  • Responding to emergencies. 

    Documentation is necessary; contact Risk Management at 2320 for training assistance.

The DOT requires proper labeling, placarding, and shipping papers for any hazardous material offered for transportation in commerce to prevent spills and exposures or injuries due to hazardous materials. Hazardous materials are identified by labels on the drums or packages and placards on the trucks hauling them.  There are 9 classes of hazardous materials: 1 - explosives; 2 - gases; 3 - flammable liquids; 4 - flammable solids; 5 - oxidizers; 6 - poisons; 7 - radioactives; 8 - corrosives; and 9 - miscellaneous hazardous materials (such as asbestos). In order to work safely with hazardous materials, read the label, review the Safety Data Sheet to check proper personal protective equipment, compatibilities, proper handling, and spill responding.

Hazardous Waste

UWSP is a Small Quantity Generator of Hazardous Waste.  We generate wastes that are toxic, corrosive, reactive, and/or combustible, besides other chemicals that are specifically listed as hazardous wastes. Hazardous Wastes are generated within many departments at UWSP.  Any employee involved in the generation, disposal, or management of hazardous waste is required to have annual training.  Annual training can be found at https://www3.uwsp.edu/hr/Pages/Chemical-Safety.aspx

Hazardous Waste must be identified properly; labeling and storing must be done by properly trained personnel.  Shipments of Hazardous Wastes are made quarterly.  Persons handling hazardous waste must know how to respond to emergencies (ie: spills & fires). For additional resources see the Materials Disposal resources.

Hoisting Equipment

Individuals must receive specific training from their department prior to using hoisting equipment. Equipment used to lift product must be closely inspected.  This includes, but is not limited to inspection of the ropes, slings, chains, controls, hooks, stops, tracks, etc. Overhead cranes and hoists must be inspected each day.  NEVER use defective product or equipment and never walk beneath a suspended load.  Stop work and report any questions to your supervisor.

Ladder Safety/Fall Protection

Ladders must be inspected before use; unsafe ladders must be removed from service and repaired before use. Ladder feet must be non-skid and in good condition. Be very careful to avoid slippery surfaces on the ground and on the steps of the ladder being used. Do not use makeshift ladders.

The top two rungs of stepladders must not be used to stand on. Ladders must not be moved while a person is on the ladder. Ladders may only be used vertically, never horizontally.

A straight ladder must be extended one foot out from the vertical for every four feet of length (a 12' ladder must be extended from the base 3' from the vertical). Workers must maintain a three-point contact with the ladder at all times, keep the belt buckle within the railings. When extended above the roof-line, the extension ladder must extend at least 3 feet above the roof edge.

Full-Body harnesses with lanyards must be worn when working off mechanical scaffolds, incomplete staging, or any time there is a chance of falling more than six (6) feet.  Alternative fall protection devices must be approved by the Environmental, Health, & Safety.  A full-bodied harness with lanyard attached to the platform or boom strap must be worn by each individual working in an aerial bucket (Jig-Type Lifts).  Harnesses with lanyards are not required for scissors lifts provided all railings are intact, gates are closed, chains are attached, and occupants' feet remain on the platform.

It is very important that lanyards and harnesses are inspected PRIOR TO EACH USE.

Lead Awareness

The UWSP will conduct routine lead exposure assessments prior to construction activities to determine if any employee may be exposed to lead at or above the action level. Proper work practices will be determined, and hazard communications will be initiated as required from the lead exposure assessment. Supervisors are responsible for ensuring these practices within their area of responsibility.

Lockout/Tagout Awareness Training

Many occupational accidents are caused by the uncontrolled release of hazardous energy from machines and equipment.  Most of these accidents may be prevented by the use of proper lockout/tagout procedures. The purpose of this session is to inform affected and other employees of lockout/tagout requirements so that accidents will be prevented. 

This awareness training is designated for individuals who fall under the following OSHA definitions:
Authorized Employee = A person who locks-out or tags-out machines or equipment in order to perform servicing or maintenance on that machine or equipment.
Affected Employee = An employee whose job requires him/her to operate or use a machine or equipment on which servicing or maintenance is being performed under lockout or tagout, or whose job requires him/her to work in an area in which such servicing or maintenance is being performed.
Other Employee = Employees who are neither “Authorized” nor “Affected”, but who work in areas where Lockout/Tagout activities take place.
 
NOTE:  Authorized Employees are required to have additional training which details recognition of applicable hazardous energy sources, the type and magnitude of the energy available in the workplace, and the methods and means necessary for energy isolation and control.   ONLY TRAINED AUTHORIZED EMPLOYEES ARE ALLOWED TO PERFORM ACTUAL LOCKOUT/TAGOUT. 
 
What Is Lockout/Tagout?  A lockout is a method of keeping equipment from being set in motion and endangering workers.  It’s putting equipment into a temporary condition in which all power and/or energy is de-energized or blocked.  This is called the zero mechanical state (ZMS).  Basics of Lockout/Tagout include:
 
§  Placing the Energy Isolating Device (disconnect switch, circuit breaker, valve, or other energy isolating device) in the safe or off position.
§  Attaching a lock to the Energy Isolating Device so that the Energy Isolating Device is secured in the off or safe position.  This prevents the equipment from being energized.
§  Attaching a tag or a sign on or near the Energy Isolating Device that warns against operating the equipment or machinery.
§  Ensuring all stored energy is relieved or made safe.
§  Communication between authorized and/or affected employees at all stages of the process.
§  Safe start-up procedures.
 
When Should Lockout/Tagout Take Place?  Lockout/Tagout is required whenever service, clean-up, or maintenance is being performed around any machine where an employee could be injured by unexpected start-up of the equipment or release of stored energy.  Lock out/Tagout is also required in certain situations involving the removal of guards, work at the point of operation, and shut down of broken equipment.

What Is Hazardous Energy?  Some types of hazardous energy are electricity, pressurized hydraulic fluid, pneumatic, chemical, thermal, and certain types of stored energy such as spring force and gravity.   To protect employees from injuries, locking type devices with warning tags are used to keep the Energy Isolating Device in the “off” or “safe” position.

Below is an example of a Lockout and Tagout device: 


The lock is the isolation device used to prevent a machine from operating and/or prevent energy from being released during maintenance, servicing, or clean-up. The tag is the visual indicator for the lockout that includes the name of the person responsible for the locked-out condition. 

Remember:
§  Do not attempt to operate any switch, valve or other energy isolation device that is locked and/or tagged out.
§  Do not remove a lock or tag on a machine or piece of equipment that is locked/tagged out.
§  All affected employees are to be notified when a lockout will begin and end on equipment applicable to their position.

Never tamper with lockout/tagout devices and never attempt to operate any machines that have these devices on them.  To do so may endanger your life and the lives of those who are performing work on the machines. 


Manual Lifting

Things You Can Do On The Job

 
Never attempt any lifting until your body is warm and loose. Perform some simple stretching and warm-up exercises if necessary.

Do not attempt to lift heavy or bulky items alone.  Depending on your job, get assistance if the load is too heavy. Get assistance from another person or material-handling equipment (cart, pallet truck, forklift, hoist, crane, etc). Reduce the amount of weight lifted. For example, if you're moving a bunch of books, better to load several small boxes than one extremely heavy load. Use handles and lifting straps whenever possible.

Pushing the object is safer than pulling it to the desired location.  Store materials at least 12 inches off the ground, where possible, this minimizes the danger of one of the most hazardous movements -- lifting directly from the ground.   Avoid lifting in a situation where the body will be twisted. Never try to catch heavy falling objects.

Techniques

 
The human back operates on a 10:1 ratio. Bending over to lift a ten-pound object actually puts 100 pounds of pressure on your lower back. When you add in the 105 pounds of the average human upper torso, you see that lifting a ten-pound object actually puts 1,050 pounds of pressure on the lower back.


Proper Lifting Procedures

You can't avoid lifting, but there are ways to reduce the amount of pressure placed on the back. By bending the knees, you keep your spine in a better alignment, and you essentially take away the lever principle forces. Instead of using your back like a crane, you allow your legs to do the work.
 
 
Follow these steps when lifting:
 
1. Take a balanced stance with your feet about a shoulder-width apart. One foot can be behind the object and the other next to it. Keep the back straight to keep the spine, back muscles, and inner organs in correct alignment. This will minimize the chance of a hernia.

2. Squat down to lift the object. Grip the object with the whole hand for more lifting power. Center your body over your feet for balance and lifting power. Get as close to the object as you can.


3. Use your palms (not just your fingers) to get a secure grip on the load. Make sure you'll be able to maintain a hold on the object without switching your grip later.
 
 
4. Lift gradually using your leg, abdominal and buttock muscles and keeping the load as close to you as possible. Keep your chin tucked in so as to keep a relatively straight back and neckline. Bend your legs and then lift the object by straightening the legs. Your leg muscles will now take the load instead of your back.

5. Once you're standing, change directions by pointing your feet in the direction you want to go and turning your whole body. Avoid twisting at your waist while carrying a load. Reduce overhead reaching.

 
 When you put a load down, use these same guidelines in reverse.

Personal Protective Equipment (PPE)

When possible, safety hazards at UWSP will be eliminated or guarded through the use of engineering and/or administrative controls.  Personal protec­tive equip­ment (PPE) will be used to supplement these efforts and further ensure employee safety as necessary.  PPE includes safety glasses/goggles, gloves, safety shoes with steel toe guards, hearing protection, face shields, hard hats, fall protection, respirators, aprons, etc. All personal protective equipment has limitations. A requirement to use a particular form of PPE in a certain area of the University may be based on one or more considerations.  It may be the result of a safety or hazard assessment that indicated the need.  It also could be the result of having performed exposure monitoring, SDS recommendation, or it might be required by an OSHA regulation. See the UWSP Personal Protective Equipment page for more details.

Powered Industrial Vehicles

Separate training classes are required for those who will need to operate forklifts, aerial lifts, powered platforms, vehicle mounted work platforms and other specialized equipment. This will include information on liquefied petroleum (LP) gas used for power.

Pedestrians:  Keep a close watch while walking on campus for powered vehicle traffic! DO NOT pass beneath suspended loads of any kind.  Stay clear of any industrial vehicles.

Other Information

Smoking:


NO smoking or tobacco products are allowed in University Buildings!   Never smoke near flammable materials. Do not litter areas with butts.


Smoking in unauthorized areas is not allowed.  See building floor plans for designated smoking areas outside the buildings.

Outside Contractors:

New outside contractors should attend a safety orientation before beginning work presented by the Project Manager or designee.  All safety and health requirements must be met by the contractor and they are responsible for compliance.

Crosswalks:

Use crosswalks. They are there for your safety.

Additional Training:

There are other job-specific training programs required for various positions. Much of this information is awareness-level training. Full courses in specific topics (e.g. confined space, lockout/tagout, etc.) may be required depending on one’s job duties. Supervisors are to contact EHS (2320) for assistance in determining their department’s training requirements.

Recycling and Trash Collection

Jugs or bottles for recycling or trash must have caps removed and be thoroughly rinsed (triple-rinsed) and dry before the recycling crew will take them. https://www.uwsp.edu/sustainability/Pages/Waste-and-Recycling.aspx

Broken glass must be in boxes or, preferably, pails labeled “broken glass” and must not be in plastic bags. http://www.uwsp.edu/facsv/Pages/Recycling.aspx.

Metal wire for disposal or recycling must be in boxes or pails; not in plastic bags.

The recycling supervisor will be notified if the recycling crew leaves jugs or broken glass at a dock. The EHS Officer will then be notified.

We expect everyone to follow these procedures to avoid injuries. Everyone’s cooperation is very much appreciated.

​​ ​

FAQ