A recurring Zoom meeting allows you to maintain the same Meeting link, Room ID, and Passcode for all of your Office hours. The room can be deleted if you want to replace or remove it, and it leaves your Personal Meeting Room for other meeting uses.
Important Note: A recurring Zoom meeting creates a separate Topic/meeting occurrence for each day it's scheduled yet all occurrences keep the same Meeting link, Room ID, and Passcode. A separate occurrence can be deleted (e.g. an office hour that falls on Thanksgiving) or all can be deleted at once.
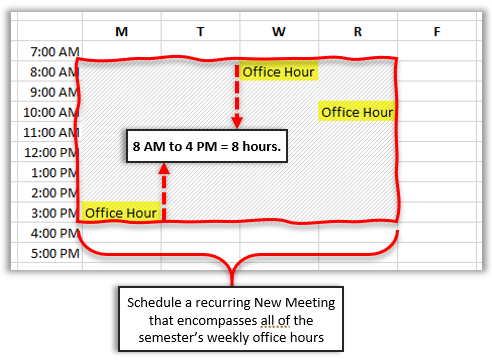
To schedule office hours in with a Zoom meeting you just need to create a recurring meeting with the
Duration set from the start of the earliest office hour through the end of the latest office hour within your typical semester week.
Go to your UWSP Zoom portal at
wisconsin-edu.zoom.us and click
Sign In.
On the ribbon click
Schedule a New Meeting.
Select
Meetings
at the left if you do not see your meeting rooms.

Update the following fields:
For
Topic, give the room a descriptive name that identifies it in your Meeting list.
e.g. "Fall Semester Office Hours".
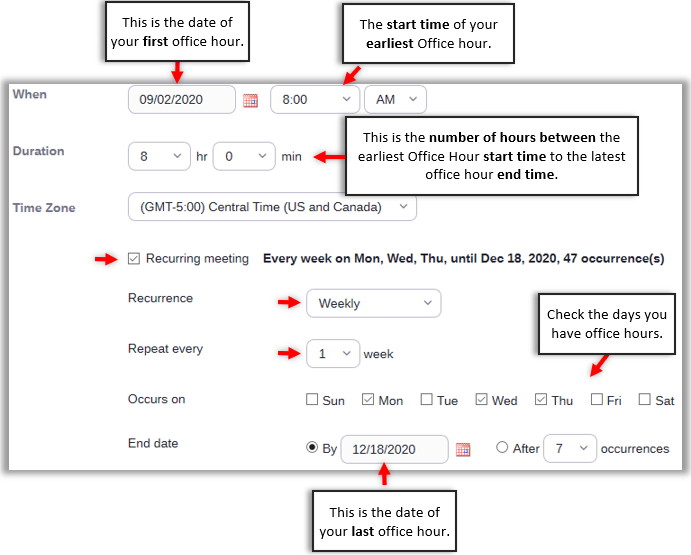
When: Change the
Date to the date of your first office hour of the semester. Set the
Time to the start time of your earliest office hour.
Note: your earliest office hour might be scheduled on a day other than the first office hour in the week.
Duration: Set to the number of hours between the
start time of your earliest office hour to the
end time of your latest office hour.
These may occur on different days. For example your latest office hour may end on Monday 4 PM and your earliest office hour may start on Wednesday at 8 AM so from 8 AM through 4 PM is 8 hours.
Recurring meeting: Place a check next to
Recurring meeting to display recurrence options.
Recurrence: Set to repeat "Weekly".
Repeat every: Set to "1" to repeat each week.
Occurs on: Select each day where an office hour is scheduled. You can also select all week days if you intend to use the room for other meetings such as student group consults. The meeting room will be available each selected day for the
Duration you set above.
End date: The last day you intend to use this meeting room in the semester.
Create a new meeting room with a new URL, Passcode, and Meeting ID for the next semester.
Scroll down and click
Save at the bottom of the page. This displays the settings you selected for your meeting room.
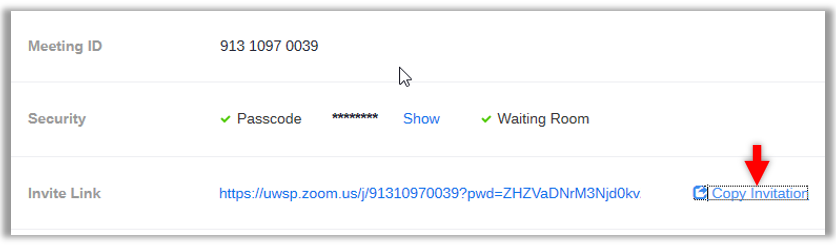
To easily select and copy your Meeting link, Meeting ID, and Passcode, click
Copy Invitation to the right of the
Invite Link.
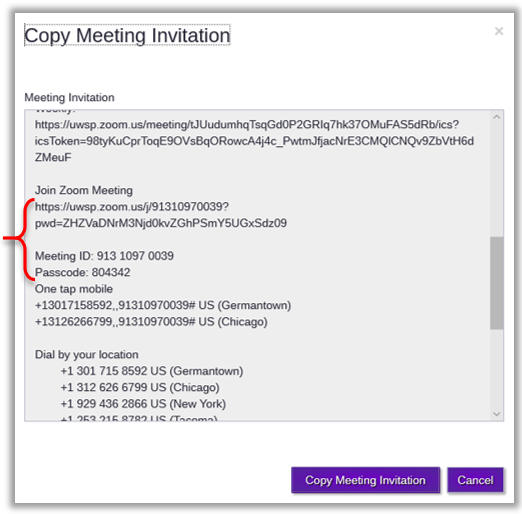
Select and copy your Meeting link, Meeting ID, and Passcode all at once from the
Copy Meeting Invitation box and share with your students.
Use the scrollbar at the right to scroll down and locate your meeting access information.
 Skip to main content
