BrightSign Digital Signage

BrightSign is UWSP's digital signage system replacing existing computer display units which are reaching end of life.

A BrightSign presentation can display one or more media zones such as rotating images with or without transitions, YouTube videos, RSS, Twitter and custom text feeds. It can also display most web pages.

If you are currently using PowerPoints for digital signage, it is easy to convert presentation slides into individual images for use in BrightSign.

See the following topics on installing BrightSign's BrightAuthor software and quick steps to create and publish BrightSign presentations including how to quickly convert a PowerPoint into separate images.

Ready for something more?  Instructions for including other media types can also be found below.

Install BrightSign's BrightAuthor software

​​ The BrightAuthor software is available through the Software Center.

Tip: before you begin working in BrightAuthor, take a few minutes to collect your BrightSign Assets (the images, video clips, etc) that you intend to use in the presentation. Save them all into one folder so that you can easily access what you need as you work.

Getting started with BrightAuthor

Note: Each time you open BrightAuthor you will receive a prompt regarding using Local File Networking. Click OK to this prompt.


The first time you open BrightAuthor a New project window automatically opens. Note: We use the term "presentation" throughout our documentation as it's a more familiar term. A BrightAuthor Project is the unpublished file which is comprised of the project space, your media ("assets"), settings including the published presentation schedule etc.

Give your new presentation project a name then Browse to save it to a folder dedicated to your BrightSign work. 

Enter the settings provided by your Campus​ Support Team or IT Support person, and click Create.


Once you create your new project, you are asked to select a Template. We strongly recommend that for your first presentation you select the Full screen template. This will give you experience with adding media to BrightAuthor and is the template that you would use to display PowerPoint slides exported as images.  You can always add or modify zones at a later date.


Click Choose to begin working in your new presentation.


Here are the most important areas to get you started designing your BrightSign presentation.

  1. By default, your new presentation opens in Edit view with your Playlist open.

  2. Your Playlist screen is where most of your work will take place. Here you add content (images, videos and BrightAuthor widgets) to your presentation zones and modify settings for things such as the timing of how long each image will display, and transitions.

  3. To access the images and videos you have collected for your BrightAuthor presentation, click the folder to the right of your Media Library's files tab, then browse to and select the folder containing the items you want to add.  

  4. Images and videos in the selected folder display in the Media Library frame below.

  5. Drag images and video clips from your Media Library to the right and drop on the Playlist for the selected zone.

  6. Select Layout to add/remove different types of zones as well rearrange and resize existing zones.

  7. Preview can be found to the far right on the Edit ribbon.

  8. Publish packages your BrightAuthor project with copies of all added media files and settings then sends it over the network as a presentation to play through your BrightSign unit on your digital signage. When you are ready to publish you can also set a schedule for when your presentation displays. Different presentations can be scheduled for different times and easily republished when updates are made.

For more information presentation project settings see BrightSign's documentation, Creating a New Project.

Create a basic BrightSign presentation with rotating images

If you have walked through the "orienting to BrightAuthor" steps above you should now have an empty Full screen presentation to work in.  If you have created a Full screen presentation, you will have one zone, Zone 1, that supports image and video files.

With your Media Library files tab selected, click the folder to the right.  Browse to and select the folder containing your images and videos.

Assets in a selected folder (such as your images and videos) display in the Media Library pane below.  Drag an image or video from the Media Library pane to the right onto the Zone 1 playlist.

If you receive a "File size too large" prompt, click OK to have BrightAuthor resize the copy of the image that is stored in the presentation.


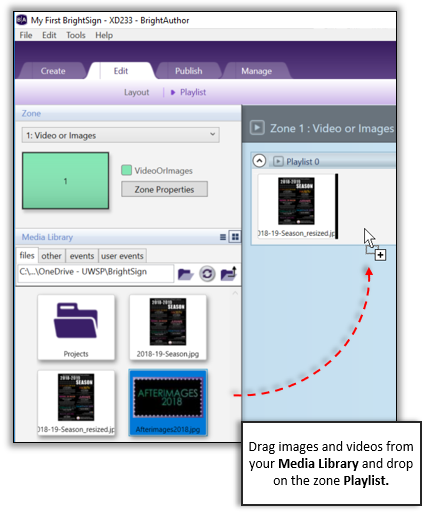
Drag additional images and video clips needed onto the zone playlist.

Reorder playlist assets: Click and drag to reorder items in the zone's playlist.

Remove playlist assets: To remove an asset you previously added to a zone's playlist, select and press your keyboard's Delete.

Tip: press Ctrl+S to save as you work.
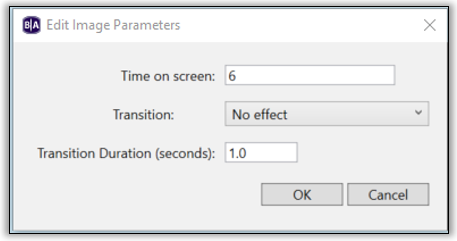
Image Parameters

Unlike videos that have a duration, images require information regarding how long they should display. You can also set transitions when moving from one image to another.

These settings are called Image Parameters.

Right-click an image in the zone's playlist and select Edit to change the defaults.

To change the parameters for multiple images at once, select the first image, press and hold Ctrl as you click additional images in the playlist. Right-click one of the selected images and select Edit.

Note: It is recommended to keep image transition time at 1 second or less and keep transitions simple and consistent.


To test your presentation, click Preview (Full) at the upper-right of the BrightAuthor screen. To close Preview, press Esc on your keyboard.

Once you are satisfied with your image timings and overall presentation, click the Publish tab at the top of the screen.

For more information on adding content to your presentation playlist visit BrightSign's documentation, "Adding Content to the Presentation Playlist".

Schedule presentations

BrightSign presentations can be scheduled to run 24 hours a day, or you can create and schedule multiple presentations for different times and events.

To schedule a presentation, select the Publish tab at the upper-left.


The presentation you were working on will display at the left, along with any other presentations in the same folder. 

To schedule a presentation, drag it from the list at the left and drop it on the calendar at the right. You can continue to add as many presentations as you need to schedule. If an added presentation overlaps you will receive a pop up box giving you options to resolve this overlap.

To add a presentation from a different folder, click Browse and select the new folder, then add the a presentation from the updated list.

Double-click a presentation on the schedule to modify the dates and times when it plays.


When you double-click a presentation, a Schedule Presentation box opens.

Select Active all day, every day to play a presentation 24/7.

Select Recurring Event to set the options such as start and end times and recurrence patterns.


When you have finished creating your presentation schedule, click Schedule on the BrightAuthor menu and select Save As.

Give your schedule a descriptive name and save into the same folder as your presentation so that you can easily find it.  The schedule will save as an xml file.

The next step is to publish your presentation.

For more information about creating a presentation schedule, visit BrightSign's documentation, "Adding Presentations to the Schedule".

Publish a BrightSign presentation

When you are satisfied with your overall presentation, click the Publish tab at the top of the screen.

You must schedule a presentation before it can be published.  See the topic, Schedule Presentations.

When you have created a schedule for your presentation(s),

  1. Right-click the BrightSign unit name and select Specify User Name / Password.  Log in using the credentials given you by IT.

  2. Click Specify Firmware Update. select the firmware update "Production Release" for your BrightSign unit model (You would have received this information from your IT support person at the time of install).

  3. Click Publish.


Once you click Publish, you will see a progress bar writing your presentation to the server and from there to your BrightSign unit and display. This packages your BrightAuthor project, settings and copies of all assets, including images, videos and text files used, into the final presentation file. When this has completed BrightAuthor will display Complete on the progress bar. Click OK to close this.

Update existing BrightSign presentations

Any time you update a BrightSign presentation, follow the steps above to Publish a BrightSign Presentation.  Any changes you make to your presentation, once published, will overwrite the current presentation that is playing.

Export PowerPoint slides as separate images

You have the option of exporting all PowerPoint slides or the selected slide only.

  1. In your PowerPoint, click File at the upper-left then select Export.

  2. Select Change File Type.

  3. At the right select JPG File Interchange Format.

  4. Click Save As.

  5.  

  6. In Save As, select a location to save your slide images, then click Save. Tip: create a folder where you will save your BrightAuthor presentation and all of the media files you will use. Save your exported images here.

  7.  

  8. Select All Slides. It may take a few moments for your export to complete. Even if you only want a few slides, remember you can always delete the images you don't need.


  9. Click OK to the box telling you that your slides have been exported to a new folder which has been given the name of your PowerPoint.


Presentation layout and zones

Your presentation Layout is comprised of different ZonesEach zone type is color-coded and specializes in displaying a different type of content such as images and videos, YouTube videos, RSS, Twitter and custom text feeds.

A BrightSign template has one or more predefined zones.  To further customize your presentation you can resize, reposition and add additional zones.

Add a Zone to Your Presentation Layout

To access and modify your presentation's layout, select Layout on BrightAuthor's Edit tab.


On the Layout screen at the left, click Add Zone.

In the New Zone box that opens, select a zone. If you intend to add several zones, it's a good idea to give your zone a name. Then click OK.


Click a zone box to make it active. Once a zone is active a tab will appear in the middle on each side.

  • Left-click a tab and drag with a double-headed arrow to resize.

  • Left-click on the zone with a four-sided arrow to move.


Click Playlist on the Edit tab to return to your main design screen.

For more detail about adding and resizing zones, see BrightSign's Customizing Zone Layouts documentation.

Zone Properties

Each zone has it's own set of properties.  To access the properties for a zone, click BrightAuthor's Edit tab and select Playlist.  Select the zone from the Zone box at the left. Then click Zone Properties.


We will cover Zone Properties important to a specific zone in the following sections.

Go to Editing Zones and select the specific zone from the left menu for more detailed information on editing that specific zone's properties.

For mor information regarding customizing your layout and zones visit BrightSign's documentation, "Customizing Zone Layouts".

Display modes for Text, RSS, and Twitter text feeds

Ticker Zone Properties -  text appearance options

Zone Properties for straight text, RSS and Twitter text feed tickers provides three different Text Appearance options.

Animated Text (Default)

  • Text without paragraph breaks displays wrapped text up to the number of lines set in Zone Properties before the next set of text displays.  The zone must be sized to fit the specified number of lines.

  • Text with paragraph breaks displays one line at a time, even if zone is sized to display multiple lines.

Static Text

  • Text without paragraph breaks displays wrapped text up to the number of lines set in Zone Properties before the next set of text displays.  The zone must be sized to fit the specified number of lines..

  • Text with paragraph breaks displays one line at a time, even if zone is sized to display multiple lines.

Scrolling Text

  • Text without paragraph breaks scrolls only one line across the screen at a time – text height is determined by height of box.

  • Text with paragraph breaks scrolls only one row across the screen at a time – text height is determined by height of box.  Paragraph breaks are displayed as diamond shape characters.


Custom text tickers

Straight text files can be added to Ticker zones to create custom text tickers for special announcements.  If you have not yet created a Ticker zone for this purpose, create one now. See the section Presentation layout and zones for how to create a zone in BrightAuthor.

Create your ticker text

To create your ticker text, open Notepad on your computer, type your announcement text and Save as a .txt file into the same folder that contains your presentation's other images, videos etc.  If you have already typed your announcement in Microsoft Word, go to File > Save As and save the file as Plain Text (*.txt).

IMPORTANT: create and save your text file before opening BrightAuthor.


Note: Creating your text file with or without paragraph breaks (pressing Enter) can determine how your ticker displays text. See the topic, Display modes for Text, RSS, and Twitter text feeds, on this page for more information.

On your BrightAuthor Playlist screen, at the left in the Zones widget select the Ticker zone to make it the active zone.

Select the Text tab in your Media Library.  Browse to and select the folder containing your text file.


Drag the widget for your ticker text to the right onto the zone's Playlist. If you don't see your text file and have verified that you have opened the correct folder, most likely BrightAuthor was open before you created your text.  Close and reopen BrightAuthor.


By default your Ticker will display as animated text. To modify these settings you need to go to the zone's Properties.

At the right, click Zone Properties to access the Text Appearance options. See the topic, Display modes for Text, RSS, and Twitter text feeds on this page for a description of each option and text behavior with and without paragraph breaks.

To test, publish your presentation. Some settings do not Preview accurately.

RSS feeds

Ticker Zones are used to add RSS feeds. If you have not yet created a Ticker zone for this purpose, create one now.  See the section Presentation layout and zones for how to create a zone in BrightAuthor.

To add your RSS feed,

  1. Click File on BrightAuthor's menu and select Presentation Properties.


  2. In the Presentation Properties box, click the Data Feeds tab.  At the left, click the plus "+" to Add Data Feed.

  3.  

  4. In the Data Feed box, enter a Feed Name and paste the RSS url into the URL box.  Click OK.


  5. At the left of your presentation Playlist, select the Ticker zone you created for your RSS data feed.

  6. Select the RSS tab from your Media Library then drag and drop the New RSS Feed widget to the right onto your selected Ticker zone’s Playlist.


  7. An RSS Feed box opens. Select your RSS feed and click OK.

     
  8. Back in the BrightAuthor Playlist, click Zone Properties for the selected zone to access the Text Appearance options. See the topic, Display modes for Text, RSS, and Twitter text feeds on this page for a description of each option and text behavior with and without paragraph breaks.

YouTube video

Note: These instructions are for single YouTube videos only. If "list" displays in the YouTube URL, you have copied the URL of a playlist containing multiple videos. e.g.: https://www.youtube.com/playlist?list=PL565298C3BFD6D5EC. See the topic YouTube Video Playlists.

  1. Copy the following sample URL and paste into a text editor: 

    https://www.youtube.com/embed/y1XxnZA1yiQ?playlist=y1XxnZA1yiQ&autoplay=1&rel=0&controls=0&showinfo=0&loop=1

    We modify this URL as it contains the information needed to display a YouTube Video in BrightSign's HTML5 widget.

  2. Copy the YouTube ID at the end of your selected YouTube video URL.

    The YouTube video ID is found at the end of the YouTube URL. For example:  https://www.youtube.com/watch?v=dSlE4JLGggo

  3. In the first sample URL that you copied and pasted into a text editor, delete both instances of the default ID (highlighted text below) replacing both with the ID of your selected video.

    Delete both IDs:
    https://www.youtube.com/embed/y1XxnZA1yiQ?playlist=y1XxnZA1yiQ&autoplay=1&rel=0&controls=0&showinfo=0&loop=1

    Replace both with the ID of your selected YouTube video:

    https://www.youtube.com/embed/dSlE4JLGggo?playlist=dSlE4JLGggo&autoplay=1&rel=0&controls=0&showinfo=0&loop=1

    Now that we have our new URL, we need to make it available for use in BrightAuthor. First we will add it to our Presentation Properties as an HTML Site. Then we can use it whenever we want in our presentation.

  4. Click File on BrightAuthor's menu and select Presentation Properties.


  5. In the Presentation Properties box that opens, click the HTML Sites tab.  At the left click the plus "+" to Add HTML Site.


  6. Add a descriptive name then select URL and paste your modified URL to the right.


  7. Click OK to both boxes. 

  8. In the Save Properties box that opens, decide whether you need your new HTML site available to future presentations, then click OK.


    We can now add the YouTube video HTML Site to our BrightSign presentation.

  9. To display our YouTube video HTML Site you need a VideoOrImages zone in your presentation.  If you do not yet have one for this purpose, create one now.  See the section Presentation layout and zones for how to create a zone in BrightAuthor.

  10. In the Zone box at the upper-left of your Playlist, select the zone where you want to add your YouTube video.

  11. From your Media Library, select the other tab then drag the HTML5 widget to the right onto your selected zone's Playlist.


  12. In the HTML5 box that opens place a check next to Enable external data and Enable native video plane playback.

  13. At the upper-right, make sure that the HTML Site you created is selected.


  14. Click OK.  Your YouTube video should be ready to play.  

It's important to note that BrightSign's Preview tool displays an error when previewing YouTube videos yet videos display fine once published.  To test, publish your presentation.

For more detailed instructions and variations on settings, See BrightSign's documentation on playing a YouTube Video.

Note:  Multiple HTML5 widgets can be added to a VideoOrImages playlist. You can also add them in combination with images, videos or other HTML5 widgets.

YouTube video playlists

Note: These instructions are for YouTube video Playlists only. If "list" does not display in the YouTube URL, you have copied the URL of a single YouTube video. e.g.: https://www.youtube.com/watch?v=dSlE4JLGggo.  See the topic, YouTube videos.

To add a YouTube Playlist to your BrightSign presentation we use instructions similar to the YouTube Video section above, except you will need to modify this URL to change both the YouTube Video ID and the List ID:

https://www.youtube.com/embed/6ynHup5cOtQ?listType=playlist&list=PLSyEPgiE-v9QZH1yw1BlAAuFMVoLJNSJx&autoplay=1&rel=0&controls=0&showinfo=0&loop=1 

  1. Copy the following sample URL and paste into a text editor: 

    https://www.youtube.com/embed/6ynHup5cOtQ?listType=playlist&list=PLSyEPgiE-v9QZH1yw1BlAAuFMVoLJNSJx&autoplay=1&rel=0&controls=0&showinfo=0&loop=1

    We modify this URL as it contains the information needed to display a YouTube Video List in BrightSign's HTML5 widget.

  2. Begin playing the first video in the YouTube video list to access the updated URL.

  3.  Copy the YouTube video ID. The YouTube video ID is found in the middle of the YouTube browser URL between "v=" and "&list".  

    Example YouTube playlist URL with video ID highlighted: 
    https://www.youtube.com/watch?v=hX4nwub7ssw&list=PL6GrdD56ta4-Ppq9D7jalKzq5pEr55vbM

  4. In the sample URL that you copied and pasted into a text editor, delete the example YouTube video ID (highlighted text below) and replace it with the ID of your selected video.

    For example, 

    Delete the example ID between "embed/" and "?listType":

    https://www.youtube.com/embed/6ynHup5cOtQ?listType=playlist&list=PLSyEPgiE-v9QZH1yw1BlAAuFMVoLJNSJx&autoplay=1&rel=0&controls=0&showinfo=0&loop=1

    Replace with the video ID of your selected YouTube Playlist video.  This is the ID of the first video in the list that you began playing:

    https://www.youtube.com/embed/hX4nwub7ssw?listType=playlist&list=PLSyEPgiE-v9QZH1yw1BlAAuFMVoLJNSJx&autoplay=1&rel=0&controls=0&showinfo=0&loop=1

  5. Next, in the sample URL that you are modifying, delete the example Playlist ID following "list=" (highlighted text below) and replace it with the playlist ID of your selected video playlist.

    Delete the example playlist ID between "list="  and "&autoplay":

    https://www.youtube.com/embed/6ynHup5cOtQ?listType=playlist&list=PLSyEPgiE-v9QZH1yw1BlAAuFMVoLJNSJx&autoplay=1&rel=0&controls=0&showinfo=0&loop=1


    Paste the playlist ID from your YouTube Playlist URL between "list="  and "&autoplay":

    https://www.youtube.com/embed/6ynHup5cOtQ?listType=playlist&list=PL6GrdD56ta4-Ppq9D7jalKzq5pEr55vbM&autoplay=1&rel=0&controls=0&showinfo=0&loop=1


    The playlist ID is found at the end of the YouTube playlist URL. 
    Example:
    https://www.youtube.com/watch?v=hX4nwub7ssw&list=PL6GrdD56ta4-Ppq9D7jalKzq5pEr55vbM


  6. Now that we have our new URL, we need to make it available for use in BrightAuthor. First we need to add it to our Presentation Properties as an HTML Site. Then we can use it whenever we want in our presentation.

  7. Click File on BrightAuthor's menu and select Presentation Properties.


  8. In the Presentation Properties box that opens, click the HTML Sites tab. Then at the left click the plus "+" to Add HTML Site.


  9. Add a descriptive name then select URL and paste your modified URL to the right.


  10. Click OK to both boxes. 

  11. In the Save Properties box that opens, decide whether you need your new HTML site available to future presentations, then click OK.


    We can now add the YouTube playlist HTML Site to our BrightSign presentation.  To display a YouTube video playlist you need a VideoOrImages zone.  If you do not yet have one for this purpose, create one now.  See the section Presentation layout and zones for how to create a zone in BrightAuthor.

  12. In the Zone box at the upper-left of your Playlist, select the zone where you want to add your YouTube video.

  13. From your Media Library, select the other tab then drag the HTML5 widget to the right onto your selected zone's Playlist.


  14. In the HTML5 box that opens place a check next to Enable external data and Enable native video plane playback.

  15. At the upper-right, make sure that the HTML Site you created is selected.


  16. Click OK.  Your YouTube video should be ready to play.  

It's important to note that BrightSign's Preview tool displays an error when previewing YouTube videos yet videos display fine once published.  To test, publish your presentation.

For more detailed instructions and variations on settings, See BrightSign's documentation on using YouTube Playlists in your BrightSign presentations.

Note:  Multiple HTML5 widgets can be added to a VideoOrImages playlist. You can also add them in combination with images, videos or other HTML5 widgets.

Text twitter feeds

A Twitter Text feed displays text "tweeted" by the logged in account.  It is strongly recommended that you use or create a Twitter account that is used exclusively by your department or program for the purpose of "tweeting" up to the minute information to display via BrightSign.

Add Twitter Text Feeds to Ticker zones to display your text "Tweets" for special announcements.  If you have not yet created a Ticker zone for this purpose, create one now. See the section Presentation layout and zones for how to create a zone in BrightAuthor.

To add the text feed "tweeted" by your account to a Ticker zone,

  1. Select the Ticker zone, then select the RSS tab from your Media Library.

  2. Drag the New Twitter widget to the right onto your Ticker zone’s Playlist.


  3. Enter the Twitter User Name created for this purpose.  

  4. To display only the most recent tweets, place a check next to “Only show…”.  At the right enter the number of tweets to display.

  5. Click Authenticate.


  6. Enter your Twitter account password on BrightSign's Twitter Authorization screen and click Authorize app.

  7.  

  8. Click OK to the updated Add Twitter Feed box.

  9. Back in the BrightAuthor Playlist, click Zone Properties for the selected zone to access the Text Appearance options. See the topic, Display modes for Text, RSS, and Twitter text feeds on this page for a description of each option and text behavior with and without paragraph breaks.

Twitter feeds - with web content

Twitter HTML feeds must be accessed via a logged in account. Feeds display in an HTML format.  It is strongly recommended that you use or create a Twitter account that is used exclusively by your department or program for the purpose of displaying Twitter HTML feeds via BrightSign.

To add a Twitter HTML feed to your presentation, you will need a VideoOrImages zone. If you do not have one yet for this purpose, create one now.  See the section Presentation layout and zones for how to create a zone in BrightAuthor.

  1. Download and extract BrightSign Support's Twitter HTML feed template zip file at the bottom of this BrightSign support article. Make a copy of Arsenal_Twitter.html and rename it.  Like the original html file, this new file should also be directly outside of the css folder. Note: you will see an additional BBC_News sample html file. Ignore this.

  2. Log into the Twitter account created for your BrightSign display.  Search for the Twitter feed you intend to use then copy the url from your browser address bar.

  3. With the Twitter feed url copied, click the vertical ellipses to the right of Follow.

  4.  

  5. Select Embed this Profile from the menu that opens.

  6.  

  7. On the next screen click publish.twitter.com.

  8.  

  9. Paste your copied url int the "What would you like to embed" box, then click the arrow at the right.

  10.  

  11. Select Embedded Timeline.

  12.  

  13. Click Copy Code.

  14.  

     We now need to add the copied code to the html file we copied and renamed earlier.

  15. Open a plain text editor such as Notepad and select File, then Open...

  16. In the Open box, change the file type to All Files, then select and Open the html file you copied and renamed earlier.


  17. Delete the text between the tags, <div id="vertical-scroll"> and </div> and replace with the code copied from Twitter.  Save and close the file.

  18.  

    Your new Twitter html feed can now be added in BrightAuthor.

  19. Click File on BrightAuthor's menu and select Presentation Properties.

  20.  

  21. Select the HTML Sites tab and click Add HTML Site.


  22. In the HTML Site box, give your new Twitter HTML site a name.

  23. Select Local Content then click Browse at the right and select your Twitter html file.


  24. Click OK to both boxes.

  25. On your BrightAuthor Playlist select the VideoOrImages zone you created for this purpose, or create one now.

  26. From the Media Library, select the other tab then drag the HTML5 widget to the right onto your selected zone’s Playlist.


  27. In the HTML5 box that opens, make sure the Twitter HTML Site you created is selected.

  28. Place a check next to Enable external data, and Enable native video plane playback and click OK.

  29.  


From BrightSign support article: https://brightsign.zendesk.com/hc/en-us/articles/115000616273-How-to-display-a-Twitter-Embeded-Timeline-feed-on-a-BrightSign-Player


Web pages

The steps to adding a web page to your BrightSign presentation are similar to the above steps for adding a YouTube video - except that there is no need to modify the web page URL.

Important: Note that the design of some web pages may prevent the page from displaying correctly. Make sure to test by publishing your presentation.


To add a web page to your presentation, you will need a VideoOrImages zone. If you do not have one yet for this purpose, create one now.  See the section Presentation layout and zones for how to create a zone in BrightAuthor.

  1. Click File on BrightAuthor's menu and select Presentation Properties.


  2. In the Presentation Properties box that opens, click the HTML Sites tab.  At the left click the plus "+" to Add HTML Site.


  3. In the HTML Site box that opens, add a descriptive name then select URL and paste your web site's URL to the right.


  4. Click OK to both boxes.

  5. In the Save Properties box that opens, decide whether you need your new HTML Site available to future presentations, then click OK.


  6. To display our web page HTML Site you need a VideoOrImages zone in your presentation.  If you do not yet have one for this purpose, create one (see the topic, Presentation Layouts and Zones).

  7. In the Zone box at the upper-left of your BrightAuthor Playlist, select the zone where you want to add your web page.

  8. From your Media Library, select the other tab then drag the HTML5 widget to the right onto your selected zone's Playlist.


  9. In the HTML5 box that opens place a check next to Enable external data and Enable native video plane playback.

  10. At the upper-right, make sure that the HTML Site you created is selected.

  11. Click OK.


Note:  Multiple HTML5 widgets can be added to a VideoOrImages playlist. You can also add them in combination with images, videos or other HTML5 widgets.

‭(Hidden)‬ Easy Panels Sample Panel

Note: You can make other web parts into tabs by setting the "Chrome Type" property to "Title Only".

​Additional Information

‭(Hidden)‬ About screen burn-in

https://en.wikipedia.org/wiki/Screen_burn-in

Find your BrightSign unit's IP address

You may need to locate the IP address of a BrightSign unit when troubleshooting or installing an additional unit.

To find the IP address of your BrightSign unit,

Type Cmd in Windows Search on the Task bar.

Select Command Prompt.

To the right of your name type Ping, press the spacebar, then type the BrightSign unit name (the unit name will have been provided by IT support when the unit was installed).

Press Enter.


Error: "Unable to access a BrightSign at that IP address"

Error: "Unable to access a BrightSign at that IP address"

This error may be seen when attempting to enter the BrightSign unit's username and password.

Troubleshooting:


Wait 5-10 minutes and try again.  


If you have been editing and republishing repeatedly and are confident that power to the unit and network connectivity has not been interrupted the error may resolve itself after 5-10 minutes.


Test access to power and network by pinging the unit to find the IP address.  


To ping your BrightSign unit follow the steps in the section Find your BrightSign unit's IP address

  • Your ping returns the IP address of the unit

You will see a "Reply from" displaying the IP address of your unit (for example: 143.236.92.78). 

Compare the displayed IP address with the IP address provided by IT support at the time of the unit's install. if different, replace the IP: Tools > Setup> Advanced Network Setup ???????

If the same, contact the IT Service Desk for assistance.

  • Your ping returns the IP address of the unit but additionally says "Destination host unreachable"

Verify that the BrightSign player’s power and network cables are properly connected. Contact the IT Service Desk if you continue to experience problems.

  • Your ping returns “could not find host”

Verify that the name of the unit displayed under Networked Units matches the name provided to you by IT at the time the device was installed.

If the names don't match, remove the name of the unit displayed under Networked Units and re-add the unit with the correct name as a new unit (see section Add a new BrightSign unit).

If the name is correct, contact the IT Service Desk for assistance.

‭(Hidden)‬ Add a new BrightSign unit

To add a new BrightSign unit to your Networked Units list,

Insert a formatted MicroSD card into the computer card reader.

Start the BrightAuthor software.

Click Tools on the menu and select Setup BrightSign Unit.

In the BrightSign Unit Setup box under Name Specification enter a unit Name in the format:

<Bldg Abbr>-<Room#>-DS (e.g. CBB-200-DS)

Note: Room# is where the BrightSign unit display is set up. "DS" is Information technology's designation for digital signage.

Customization: Use name only.

Click Advanced Network Setup: enter the same Name that was entered in the previous box then click OK to return to the BrightSign Unit Setup box.

 Time zone: select CST: US Central Time.

In the middle column enter the admin and user name passwords provided by your IT support.

Select Networked with Local File Networking.

At the lower-right, click Create Setup Files and select the microSD card.


Preview won't close

To close your presentation preview, press ESC on your keyboard.

If your preview still has not closed and an error message displays, press ESC multiple times to close both error boxes and the preview screen.

Some error messages display only in preview mode yet a presentation will publish and play without issue. 

Update one presentation in a larger schedule

To modify a presentation that only represents part of an entire schedule, make your edits to the single presentation and save (File > Save).  Go to Publish then select Open from the Schedule menu.  Browse to and Open the original schedule you created. The calendar will update and display all scheduled presentations with the correct scheduled dates and times. Republish this.

‭(Hidden)‬ Numbered Items

300-Additional Information

305- About screen burn-in

310-Find your BrightSign unit's IP address

315-Error: "Unable to access a BrightSign at that IP address"

320-Preview won't close

340-How to update one presentation in a larger schedule


399 (Hidden) Numbered Items

​​ ​