Also view DocuSign's video tutorial.
To send a document to a recipient for their digital signature, the document must be added to a DocuSign Envelope and signature Tags added to the document.
An Envelope includes:
the document(s) to be digitally signed,
the recipients you add, and,
settings and options that you assign which are instructions for how DocuSign should handle the document(s) for each recipient, as well as a recipient signing order if specified.
Note: a DocuSign Envelope can contain multiple files requiring digital signatures as long as all files require the same set of settings and signing order.
From the DocuSign homepage, drag a document to the Drop documents here... box.
OR
Click Start, select Send an Envelope then on the next screen click Upload to add your file.
Once you add your first file, you will see an option to add an additional file. You may upload as many documents to a single envelope as needed.
Note: For information about DocuSign's supported file types and file size limitations visit this DocuSign support page.
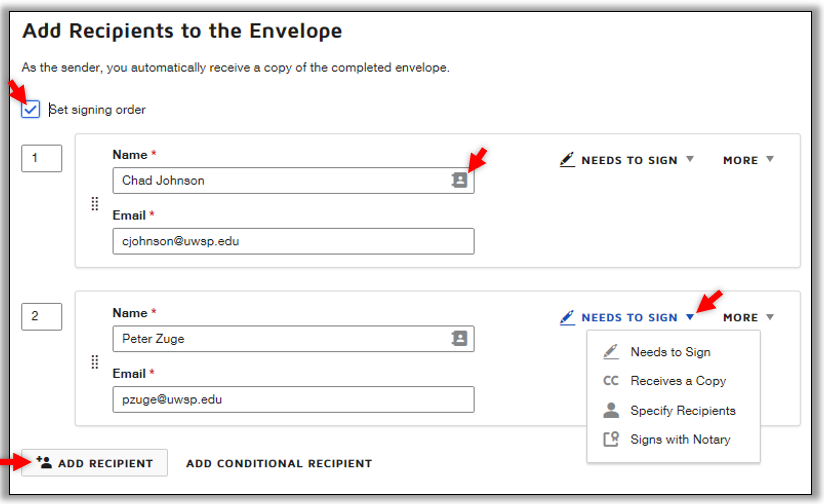
Add recipients to the Envelope: Type the recipient's first and last name into the Name field. In the Email field enter the full email address. Addresses already available through DocuSign will auto-populate.
You can also click the Address Book icon to the right of the Name field to select a recipient from your Address Book or the UWSP Directory.
Once you send your Envelope, email addresses that you manually add will save to your DocuSign Address Book.
By default, your envelope will be sent to all recipients at the same time.
Set a Signing Order: If your document should be reviewed and signed by one or more recipients before moving to the next recipient, place a check next to Set signing order and type a numeric order into the boxes that appear.

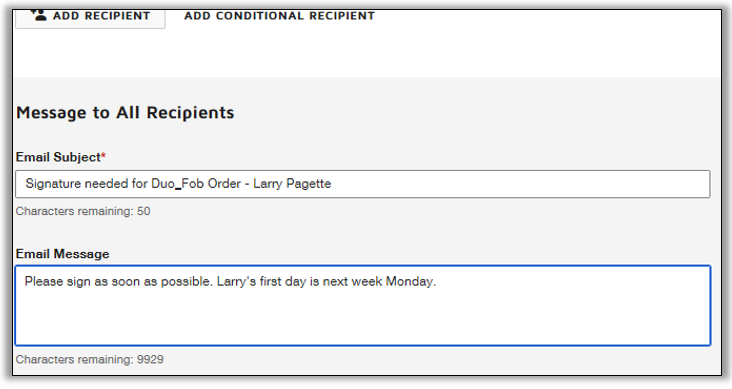
Scroll down and add a Subject and Email Message for your recipients. By default, the file name of the document you are sending is added to the Subject line. Consider making the Subject more meaningful.

To the right of the Message, you can also set Advanced Options such as reminders, and an expiration date. Coming soon - look for this option on the top toolbar.
Click Edit to the right of Advanced Options.to update these settings for the current Envelope.
IMPORTANT: do not click SEND yet! You have not yet added Signature and other tags to your document(s).
Tip: To save and send a document for signing later, at the upper-right of the DocuSign screen click Actions and select Save and Close. The unsent Envelope and it's document(s) will be saved to DocuSign's Drafts. To return to Drafts, click Manage at the top of the DocuSign screen. Drafts is located at the left in the Envelopes section.
Click Next at the top or bottom right of the DocuSign screen. You now need to add signature and other tags to your document(s).

Add a Signature tag: Adding Signature and other tags to your document is what allows your document recipients to digitally sign and add other information to the document.
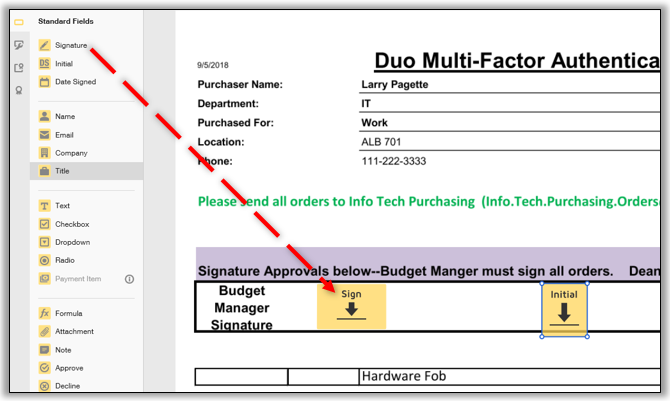
Participants and tags are located at the left of the screen. Drag the Signature tag from the top left to the area in the document where a signature is required. If Initials are also required, drag the Initials tag to the location where initials are expected. Note that you can also add a Date Signed tag for a time stamp.
If you have added more than one recipient who must sign or add other information, see Adding tags for multiple recipients at the end of this section.

Click Send at the top or bottom right of the DocuSign screen.

Adding tags for multiple recipients
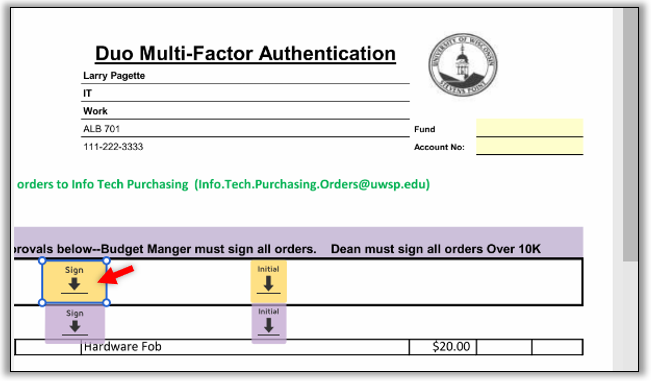
If you have assigned more than one recipient who needs to sign, or provide other information such as only their initials, each recipient must have their own assigned tags.
To assign a specific recipient to a tag:
Select one of the added tags.
At the top left a Recipients box displays. Note that each recipient is assigned a color code by DocuSign.
Click the Recipients box dropdown and select the recipient to associate with the selected tag. The tag will color-code to match the recipient.

Each set of tags is color-coded for a specific recipient.

Tag assignment is important. If a tag is assigned incorrectly a recipient will not be able to add their information to the correct line.
