Telecommuting and Remote Computing Access

From UWSP's Information Security Office and Information Technology

The UWSP Information Security Office has identified the following three scenarios and accompanying security procedures when working from home:

MOST SECURE: Use your UWSP computer at home

LESS SECURE: Use Remote Desktop to log into your UWSP computer

LEAST SECURE: Work directly from a personal computer


Use your UWSP computer (recommended as most secure)


Information Technology configures your UWSP laptop or workstation with tools to maintain a secure work environment even when working from your home. This includes up-to-date antivirus and a firewall. Your UWSP computer is your most secure option when working outside of the UWSP network.

To keep your UWSP computer secure while working from home, you are required to do the following:

  • Regularly connect to your home network using a cable. This enables your UWSP computer to automatically connect to the UWSP network and download the most current security updates from IT. Watch UWSP Campus Announcements to learn when these security patches and updates are available.

  • Do not share your UWSP computer and lock it when you step away.

  • Keep your MFA devices (phone, fobs) easily accessible and Ignore or DECLINE any unexpected MFA prompts you receive when you are not working at your computer or accessing university resources on your mobile device (an Ignore or DECLINE will not break anything).  Inform the IT Service Desk as soon as possible if MFA devices are lost/stolen, or if you have concerns about suspicious activity.

Less Secure

Use Remote Desktop to log into your UWSP computer

If you are unable to bring your work computer home with you, maintain the next most secure environment for sensitive data and your overall work by using a Remote Desktop connection to log into your UWSP computer.

If you use your personal computer to access your work computer via Remote Desktop, the following is required:

  • The personal computer must have a supported operating system.  A "supported" operating system means that it receives regular security patches and updates from the company (for example, WIndows 8, 7, or XP are no longer supported).

    • Supported PC operating systems: Windows 10 and Windows 11.

    • Supported Mac operating systems:  UWSP Information Technology supports the three latest MacOS versions. See Apple Support's MacOS page.

  • Up-to-date Antivirus must be installed on all computers where you work. This is easy if you are running Windows 10 - just make sure that Windows Defender (free with Win 10) is enabled

  • Ensure that your internet connection has a firewall, or enable the firewall that comes with your computer. Your firewall should block all incoming connections by default.
    From Microsoft Support: How to turn Windows Defender Firewall on and off.

  • Lock your computer when you step away.

  • Keep your MFA devices (phone, fobs) easily accessible and Ignore or DECLINE any unexpected MFA prompts you receive when you are not working at your computer or accessing university resources on your mobile device (an Ignore or DECLINE will not break anything).  Inform the IT Service Desk as soon as possible if MFA devices are lost/stolen, or if you have concerns about suspicious activity.

Less Secure

Work directly from a personal computer (not recommended)


Please be aware that doing your UWSP work directly from a personal computer will open this personal computer up to Open Records requests should an Open Records request be made.

If you still choose to do your work for UWSP from a personal computer without using Remote Desktop and the secure computing environment of your UWSP computer, you are requried to take the following security measures:

  • The personal computer must have a supported operating system.  A "supported" operating system means that it receives regular security patches and updates from the company (for example, WIndows 8, 7, or XP are no longer supported).

    • Supported PC operating systems: Windows 10 and Windows 11.

    • Supported Mac operating systems:  UWSP Information Technology supports the three latest MacOS versions. See Apple Support's MacOS page.

  • Up-to-date Antivirus must be installed on all personal computers where you work. This is easy if you are running Windows 10 - just make sure that Windows Defender (free with Win 10) is enabled

  • Ensure that your internet connection has a firewall, or enable the firewall that comes with your computer. Your firewall should block all incoming connections by default.
    From Microsoft Support: How to turn Windows Defender Firewall on and off.

  • Lock your computer when you step away.

  • Connect through a VPN (Virtual Private Networking). A VPN adds a layer of encryption between your computer and the network.

  • Do not share the computer where you do your university work. Spyware and other malware can easily install from predatory websites, email attachments, or software downloads for games or other activities.  However, if you have no alternative to sharing the computer or workspace with others, minimize the potential of your work being corrupted or compromized by creating and using separate local accounts for you and for anyone else using the computer.

  • How to create separate local accounts on:

  • Window​s 10

  • Mac

  • Using separate user accounts for a shared computer does not have to be burdensome. See this article on "Fast user switching".   

  • DO NOT work under your computer's administrator account - especially on shared computers!  An administrator account gives spyware the easiest access to install and capture sensitive data, or allow malware in general to compromise and even take control of your computer.

  • Keep your MFA devices (phone, fobs) easily accessible and Ignore or DECLINE any unexpected MFA prompts you receive when you are not working at your computer or accessing university resources on your mobile device (an Ignore or DECLINE will not break anything).  Inform the IT Service Desk as soon as possible if MFA devices are lost/stolen, or if you have concerns about suspicious activity.

To maintain the most secure environment for sensitive data and your overall work, the Information Security Office strongly encourages you to use Remote Desktop if you are unable to bring your work computer home with you.​​​

Working Safe

UWSP's Information Security Office also provides the following recommendations for all UWSP employees who are working outside of the UWSP environment.

Work Securely

Keep all paperwork secure when not in use.  A locked drawer is preferable.  If that is not an option, keep paperwork in a file cabinet or box out of plain sight.

Whenever possible, use Remote Desktop and work from your office computer.  Shared computers especially increase the risk of compromising sensitive data, confidential work documents, and communications.

Use a secure Virtual Private Network connection (VPN) when traveling.  Don't use public wifi without the protection of VPN. See ftc.gov's "How to Safely Use Public Wi-Fi Networks".

Keep your personal files and emails separate from your work by installing the Microsoft Office 365 desktop apps and the OneDrive Sync Client for free on your personal computer.

Always keep your work and personal emails and files separate. 

  • Don't use your personal email to conduct business.

  • Don't save university data to your personal device, computer, or flash drives.

  • Do not save work files to third-party cloud storage (Dropbox, Google Drive, etc)

See Wisconsin Public Records Law Wis. Stats. §19.31-19.39

Share Securely

DO NOT email files containing sensitive data as attachments.  Attachments are easily forwarded with no tracking mechanism. 

Instead, email shared links to documents saved in your OneDrive, or share your files through Teams with your Teams members.  See “Can I share my OneDrive files to allow viewing or even editing access?” in the “OneDrive for Business” section.

Stay Alert

Stay alert for potential social engineering attacks such as phishing. Hackers are adept at masking email addresses and crafting email requests for sensitive information that looks "real" even under close scrutiny.

Working from home increases the possiblity of a successful attack since you are unable to walk down the hall to your colleague's office to verify, or make a quick call on the campus phone system to confirm that the unusual request you received is indeed authentic.

What should you do if you suspect an email did not come from the sender that displays in the From line?

Do not reply to the original email.  Instead:

  • Find the person in UWSP's Employee Campus Directory and call the number listed. OR,

  • Follow up with the person by opening a new email and add their university address in the "To" line.


​Information Technology provides the following additional resources to help you in your work at home or when working from an off-campus location.

Your Home Work Environment

Optimize your home connection

Even if you have a super high-speed internet connection you might notice that there are times when your connection seems, well, sluggish.

Before trouble-shooting, contact your Internet Service Provider and ask them what you should expect for your download and upload speeds.

Then, check your Download and Upload speed using a tool like Speedtest.net.  Whenever you make a change, check your connection speed again to see if there is any improvement.

Once you have your internet connection speed test for a baseline, try the following:

  • Restart your router by unplugging it from power.  Wait about a minute then plug it back in.  Just like a good restart can sometimes help your computer's performance, routers can also benefit from a restart.

  • Are you on wireless?  Try moving yourself and the router closer to each other. Also avoid placing brick walls, fireplaces, or anything really dense between you and your signal.

It might be obvious, but make sure to have a password set on your router. Don't give out the password, and caution your family members as well.

  • Use a cable to connect to your router.  Remember, your bandwidth is not infinite. If all of the computers and other devices in your household are wireless, and you can't convince (sometimes multiple) someones in your household that playing video games, streaming "Breaking Bad" (or their class lecture) and calling a friend all at the same time isn't the best idea for shared wifi, go find yourself an Ethernet cable and connect to your router directly.  Your computer should autodetect the wired connect and switch to it automatically.

    By the way - DO NOT plug your computer directly into your data provider's ethernet cable.  Always go from wall connection to router to your computer.  Unless, of course, you do want to invite hackers.  And we're assuming that your router does have that password set - correct?

    If you are on Windows, you can test your connection by going to your Control Panel and check your network connection. It should now say Ethernet instead of Wifi.

    If your connection still says Wifi:

    1. Turn off your computer/laptop.

    2. Plug the cable into your router and computer.

    3. THEN restart your computer.

    4. Go to your Control Panel and check that your network connection now says Ethernet.

  • Turning off unused devices can also help.
  • Use Anti-Virus protection.  Malware can consume bandwidth because it's constantly reporting back to the mothership. Install Anti-virus protection and make sure that it is scheduled to run regular scans.  Windows 10 comes with Windows Security (previously Defender) built-in.

Other things:

  • Limit the number of browsers and browser tabs you have open.

  • Clean out your browser cache and history

  • Try to work at less peak hours of the day.  Early morning risers and night owls might find that a slight shift to their schedule may improve their connectivity.

  • If you don't need them, remove/disable browser add-ons, extensions, and plugins.  BTW - any Plugins or Extensions that are causing performance issues can also potentially be malware.

Remove/Disable Extensions for:

Edge

Chrome

Chromebooks

FireFox

Safari

Microsoft also provides some Best practices for using Office 365 on a slow network.

In particular, the sections:
  • Best practices for using your browser

  • Best practices for using Outlook and Outlook Web App

  • Best practices for using OneDrive for Business


If you have questions or need assistance, please contact the Service Desk

Why should I reboot my WiFi router?

Rebooting a router is as easy as unplugging its power, waiting a minute or two, and plugging it back in.  And of course then giving it a little time to reset itself.  But how many of us think to do this?  Unless we have internet connectivity issues and THEN we think about it - fast.

Why should we take the time to do this?  This article from Consumer Reports explains why occasionally rebooting a router is a good idea, or when it might be a good idea to update your router.

Also, if an occasional reboot is all that's needed to keep your router performing optimally, Consumer Reports also suggests the use of an outlet timer adapter to program this reboot to occur regularly at a time no one is online.

Optimize Remote Desktop Session

Connecting to your office computer from home via a Remote Desktop Connection and noticing a significant lag/slowness in your connection?

Try modifying your Remote Desktop Connection Options.

Tip: When changing settings, make one change at a time, testing after each one.

Change your connection speed

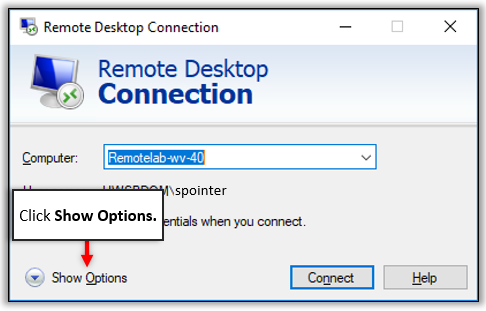
Open your Remote Desktop Connection box and at the lower-left click Show Options.

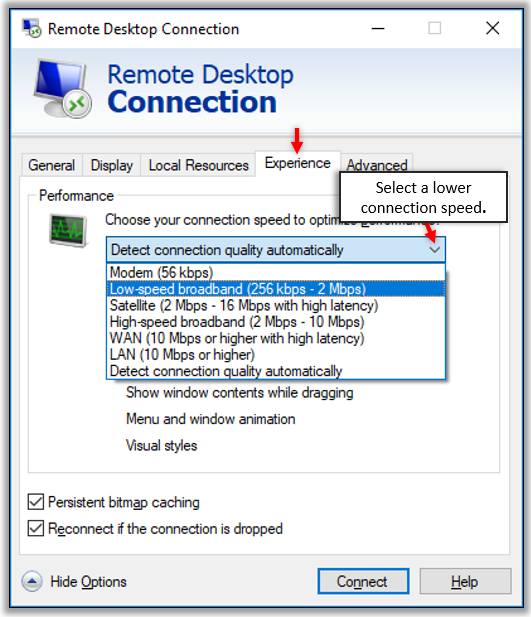
Click the Experience tab and select a connection speed that is lower than what is provided by your ISP.
 

-OR-

If you have a high-speed connection such as High-speed Broadband, select your connection speed and instead, deselect features you deem unnecessary to your experience.

For example:
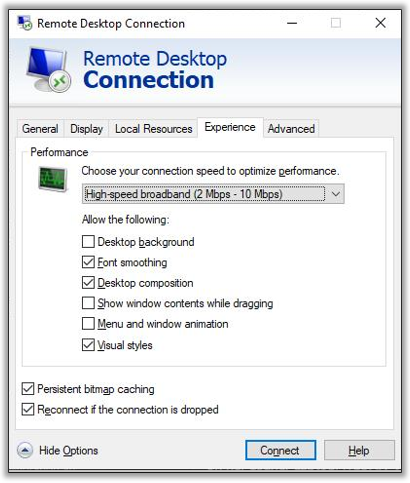

Note:  If you are not experiencing noticeable connection issues, it is recommended to leave Detect connection quality automatically selected.

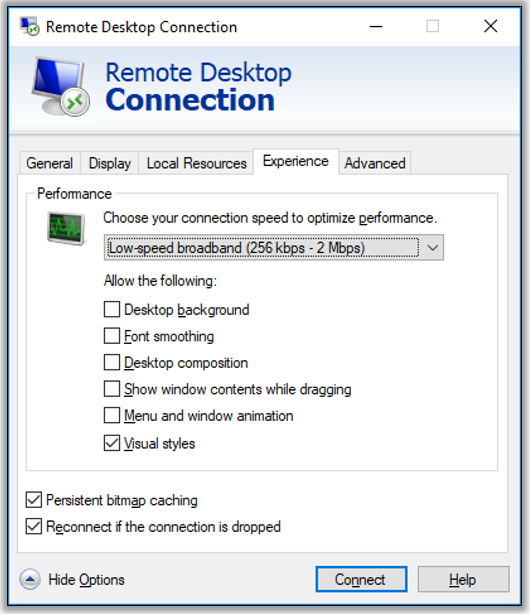
Depending on your new selected connection speed, you will see that different features are unchecked and not used when you connect. These are features that make your Remote Desktop Session more pleasant visually. These are also features that require more bandwidth through your connection.

Test!

Test to see if there is an improvement to your remote connection speed. You may want to test several connection speeds to see if you can find a good balance between the performance of your remote connection and what you are willing to sacrifice in your visual experience.

Change your Display Configuration

If your Remote Desktop screen is set to fill your home screen, you may want to modify your Display configuration because the larger the desktop screen size, the more memory and bandwidth required.

From your Remote Desktop Options click the Display tab.

Under Display configuration, move the slider to the left. Your remote desktop display will not fill the screen requiring fewer resources to run.

If you have checked Use all my monitors, consider unchecking this and working with one monitor if possible. Here again, displaying only one of your office computer screens during your remote desktop session will lower the demand on computer memory and bandwidth.

Always test!

Test to see if there is an improvement to your remote connection speed.

Restart your work computer from Remote Desktop

We all know that regularly restarting our computer can fix a LOT of problems - including just plain slowness.  And a restart is easy enough to do from our local computer.

But what if we are remoting in to our work computer?  That could use a little restart TLC too once in a while. 

If you can't find the restart option through your remote session or, just want to make extra sure that you are restarting your work computer, and NOT your local computer (where you are still working). here's how to make sure that your remote/work computer is getting that restart.

All you need are two keyboard shortcuts.

First:

Press the Windows key (Win) + D. This is the fast way to minimize everything that's open so that you can see the desktop on your remote machine.

Second:

Press Alt + F4.  Alt+F4 closes the current active window, which in this case is your work computer's desktop.

In the Shut Down Windows box that opens, select Restart, and click OK.  The restart will disconnect your remote desktop session and return you to your local computer screen.


Since Alt+F4 closes the current active window. You might be wondering, "can't I just press Alt+F4 and keep closing windows until everything is closed?"  Sure you can - if you really want to. 

Btw, if you tend to store the occasional file on your computer desktop, don' forget Win+D - it can come in handy.

Wake up your campus computer

Trying to start a Remote Desktop session to your office computer but your computer isn't responding?  Try waking it up with Information Technology's Wake My Computer service!

You will need the name of your remote computer.  If you do not remember your work computer's name, or it is not waking, please contact the IT Service Desk.

​Working With Files off Campus

Quick access to File Explorer folders

Why would you want to "pin" a folder for Quick access in your File Explorer?  Why wouldn't you!  Folders pinned to your File Explorer's Quick access are available from the top of your folder list whenever you need them!

Do your most important folders always take 15 minutes or more to find?  Pin them to the Quick access list in your Windows File Explorer!

Have you installed the OneDrive for Business Sync Client on your personal home computer?  Pin work folders from your OneDrive for Business Sync Client for Quick access in your personal home computer's File Explorer - no need to run a remote desktop session!

Folders pinned for Quick access are always available at the top of your Windows File Explorer folder list.

Don't have the OneDrive for Business Sync Client installed on your personal home computer?  Contact the Service Desk - they'll be happy to help!


To pin a folder to your Quick access folder list, right-click the folder in your Windows File Explorer and select Pin to Quick access from the short-cut menu that opens.


To easily remove a folder from your Quick access list, right-click the folder and select Unpin from Quick access on the short-cut menu that opens.

Useful Office 365/OneDrive for Business file sharing tips

The new social distancing/work from home mandate is a perfect reason to learn more about our file Sharing options available through Microsoft Office 365 and OneDrive for Business.

For example, by now you have probably noticed that when you attach a Microsoft Office file in an Outlook email, you receive a prompt asking if you want to share a link to that file which is actually stored in your OneDrive for Business, or if you would rather attach a physical copy.

What you might not have noticed is that when you share a link to your file, the default is that the shared link allows your recipient(s) to edit your file. 


And when you are sharing things like templates with students, or department documents that may only require review or approval, you may not necessarily want someone to slip and edit your original.

You can easily change this default.

To the right of the attached file click the down-arrow and mouse over Change permissions.

You can give your recipient(s) View permission instead.


Now you might think that it's just easier to send as attachment instead of sharing a link, but there are some very good and useful reasons to send a share link to a file:

For one, your recipient doesn't have to look through their email for the most current copy if you send multiple updates.  There will always be just the one copy that is kept nice and current.

You're also not filling up your recipient(s) mailbox with lots of attached copies. Considerate is what that is.

Now for the good part - have you ever sent a document out to a co-worker, your department, or committee asking for feedback?  Each person dutifully emails you their feedback through email comments, or by saving and editing their own copy, then all of the suggested edits and comments are sent back to you.  And it's you who has to merge all of that feedback into one tidy, cohesive document.  Don't do that.  Just - don't.  If you're working from home it's not like you can simply walk down to their office and ask for clarification anymore.  Cut down on back and forth email and let them make their own edits.  Use Track Changes to easily see what's been changed. Everyone will be happier.

Extra tip - Set a deadline for when feedback/edits will be accepted. A short deadline. The longer the deadline the longer it may get put off.

If you think this was a good and useful tip, wait until you see what else Office 365 and OneDrive for Business can do to help you easily share and manage your shared files.

Visit Information Technology's Office 365/OneDrive for Business FAQs page to learn more about file sharing including finding all files which are shared with you, and how to identify which files you may have shared.  We'll show you how to remove sharing too.  And just in case you've shared a file and your collaborators suddenly decide to include "everything but the kitchen sink" in what was originally supposed to be a one-page document, we'll show you how to get back the lovely version that was in the works a few weeks ago.  We'll even show you where your file's version history is - and how to use it.

​Web Conferencing Resources

Don't use web conferencing tools through Remote Desktop

Why? Because normally a web camera and microphone won’t forward video and audio through a Remote Desktop session and because using any video through Remote Desktop is often problematic.  This includes tools such as Zoom, WebEx, video chat and phone calls through Teams.

Before starting a web conference, make sure you are not working through a Remote Desktop session.  If you see the blue Remote Desktop connection bar at the top of your screen  minimize this and access your web conferencing session through your local computer.

Also, make sure the web conferencing app is installed on your local computer.  Teams is available through Office 365.  Learn about installing Office 365 for free here.

For example, if you do not yet have Zoom installed at home:

Go to zoom.uwsp.edu.

Click Download Client. This takes you to Zoom's Download Center.


Below Zoom Client for Meetings click Download.


For more information about using Zoom, visit Information Technology's Zoom page.

Have a meeting connection backup plan

Do you regularly use Teams or Zoom for meetings? Do you know what you would do if you were in an important online meeting and suddenly lost your internet connection?

Make sure to install the Zoom and Teams mobile apps on you smart phone or tablet - and take the time to familiarize yourself with them.

One way to do that is to use them during low-stakes meetings so you're comfortable using them - just in case you ever need them.

Microsoft Teams video chats and meetings

See how easy video conferencing with Teams is!

See "Schedule a Teams meeting through Teams Chat", "Schedule a Teams meeting through Teams Calendar", and "Start a channel video chat" on our Microsoft Teams page.

Zoom - Video Conferencing

So you've started working with Zoom. And you're looking for a thorough "get you off to the right start" tutorial?  Or maybe looking for something new or even just a few tips?

You're in luck!  Information Technology has lots of good information to get you up and running with Zoom!

Record Zoom Meetings and Lectures

Want to record your Zoom lecture for students to review?  Or in place of a live class? 
Maybe you're hosting an online meeting and are asked to record the group (with their permission of course) so that a co-worker who is unable to attend can get up to speed later?

It's easy enough to record in Zoom.

At the bottom of the Zoom screen click Record and select Record to the Cloud.


Pause when needed. When you're finished, Stop your recording.


Click Yes when asked if you would like to stop the recording.


Once you click Yes, watch for an email from Zoom <no-reply@zoom.us>. The Subject line will begin with Cloud Recording.  The length of your recording will determine how long it takes until you receive that email.  Please be patient.

When you receive this email, it will contain two links.

  • For Host only: This link can be accessed only by you. From here, you can get a new link to share if you lose the original Zoom email.  You can also download the recording if needed, or Delete the recording.
  • Share recording with viewers: This is the link that you share with your students or meeting participants.
For more about recording in Zoom, visit Zoom's Cloud recording page.


Online office hours in Zoom

How to do online office hours in Zoom? Here are some tips along with a few options for how to do just that!

​Other Useful Things

Off-campus access to computer lab software

Students, faculty, and staff can log into UWSP's Remote Lab for 24/7 access to computer lab software from residence halls, offices, and even from off-campus.

Insert YouTube Videos into PowerPoint


Inserting YouTube videos into PowerPoint couldn't be easier.

Open a YouTube video. Below the video click Share.


Click COPY to copy the video URL to your clipboard.


On a blank slide in your PowerPoint presentation, click Insert on the menu, and select Video > Online Video...


In the Online Video box, paste in the URL from your clipboard then click Insert.


Wait a few moments for PowerPoint to process and insert the video.


To test, go to your SlideShow view.  Click or tap your space bar to play the video.

Tip: Shift + F5 will open SlideShow view for the active slide.


Use Dictation in Microsoft Office

Tired of typing?  Use the Microsoft Office Dictation tool to type for you.

The Dictation tool is available in Word, PowerPoint, and even when creating an email in Outlook. Look for it in both the desktop and online apps.

It's easy to use - this support article from Microsoft shows you how. All you need is a mic.

The support article provides a handy list of punctuation so that you can dictate punctuation as well.  There's even a list of supported languages.

Quick tips for using LinkedIn Learning

In a previous tip, we saw that LinkedIn Learning has some great tutorials for learning all about Zoom. And it has really good tutorials for all sorts of other things too, like Photoshop, Microsoft Office, Business and Finance, and even Customer Service.  

But what if you're not the online video tutorial type?  Maybe you want the information but just don't want to sit through those videos to get it.

LinkedIn Learning tutorials provide text transcripts. At the upper-right of a tutorial, select Transcripts.  As a video tutorial plays, you will see the text being highlighted as it is spoken.

Click elsewhere within the transcripts and the video will jump to the text where your cursor clicked. Use this to jump forward, or review sections, or simply pause the video and read the text.


Maybe just want the video to play faster?

At the lower-right corner of a video is your Playback Speed. by default, your Playback Speed is set to 1x. Click this to select a different speed.


​​ ​
​Have more questions? Please contact the Service Desk,