The photo you upload will be used as your photo ID and printed on your PointCard. So that your uploaded photo is not rejected as unusable, refer to the following criteria when taking your photo.
Criteria for taking your photo
-
The photo must be of just you—do not include friends, pets, etc.
-
Choose a solid, light color background like a white wall.
-
REMOVE hats, sunglasses, headphones or other accessories—head coverings are allowed only if worn daily for religious purposes.
-
Directly face the camera and take a centered headshot from the shoulders up.
-
Check to make sure that your full face is visible in the photo!
-
Crop and size your photo to display a clear, front headshot.
-
DO NOT use camera filters.
PLEASE DOUBLE-CHECK YOUR PHOTO! Photos not following the above criteria will not be approved. Your photo will then have to be retaken and resubmitted.
Upload your photo
You can take and upload your photo using the
GET mobile app, or upload a photo you have taken using the
GET online portal from your computer.
Are you using the GET app for the first time?

-
Go to the
GET portal on your computer or download the
GET
mobile
app
 from the
Apple App Store or
Google Play.
from the
Apple App Store or
Google Play.
-
Open the app then from the list of locations select
University of Wisconsin-Stevens Point.
-
Log in with your UWSP login and password, then set your
PIN.
Take and upload your photo using the GET mobile app
You can also see the option, "Upload your photo to the GET portal from a computer"
iOS
-
Tap
Settings.
-
Select
Upload Photo or Update Photo.
-
Tap
Upload.
-
Select
Take Photo or Choose Existing Photo.
-
Allow Camera if needed.
-
Take your photo following the
Criteria for taking your photo (above).
-
Select
Use Photo.
-
If needed, rotate your photo, and size and crop.
-
Select
Submit Photo for Review.
Android
-
Tap the empty photo icon.
-
Tap the settings
"gear" icon.
-
Select
Allow to take picture.
-
Take your photo following the
Criteria for taking your photo listed above.
-
If needed, rotate your photo and size and crop.
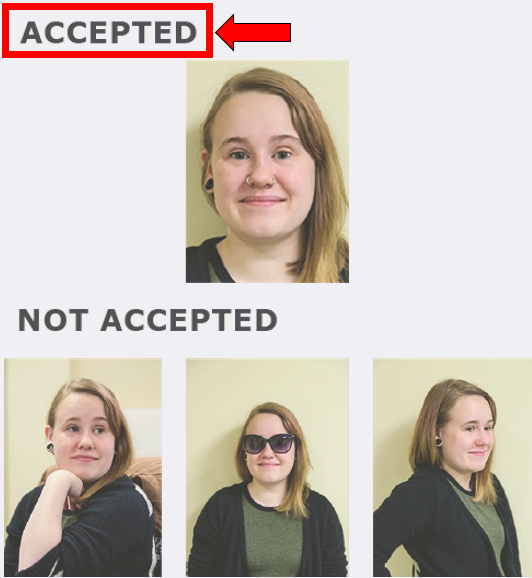
Your submitted photo should look like the
Accepted
photo below:
Watch for an email from the PointCard Office after submitting your photo! You will receive an email within one business day letting you know whether your photo was approved for use as your PointCard photo or not approved and why.
Use your computer to upload a photo you have already taken
-
Take your photo following the photo criteria above and save it on the computer.
-
Log into
GET at
get.cbord.com/uwsp with your UWSP username and password.
-
Click
Upload ID Photo at the right.
-
Click
Choose File and select your saved photo.
-
Click
Upload.
-
If needed, slide the
Crop tool to crop your photo.
If you need to rotate or resize your photo, click
Cancel. You should either retake your photo or do this work in a photo editing application.
-
When finished, close your browser.
Check your UWSP email!
Afte you upload your photo to the
GET app, you should receive an email within one business day from the
PointCard office letting you know that:
-
Your photo has been approved for use as your PointCard photo,
or,
- Your photo has not been approved along with a reason why it cannot be used for your PointCard.
If your photo is not approved you should retake your photo by carefully following the above
Criteria for taking your photo. You may also stop by the IT Service Desk after your orientation session to have your photo taken for you and printed while you wait.
 Skip to main content
